Over the next several sections of the lab it will walk you through using different tools and libraries to work with YANG. These tools and libraries include Ansible, Python ncclient, and Python requests. For these sections, you will be using your existing fabric to onboard a new L2 VNI in your existing Tenant-1 overlay.
In this module, you are going to use Ansible to perform NETCONF YANG interactions with your Leaf switches to configure a
VLAN to VNI mapping. Ansible has a few NETCONF based modules, netconf_config, netconf_get,
and netconf_rpc along with a netconf plugin to interact with NETCONF enabled devices. For this module, you
will leverage the netconf_config module to make configuration changes and the netconf_get module
to verify the configuration changes.
Return to your NX-API Sandbox on your Leaf1 using the IP address below or if you still have the session open from earlier in the lab:
Login using your username and password:
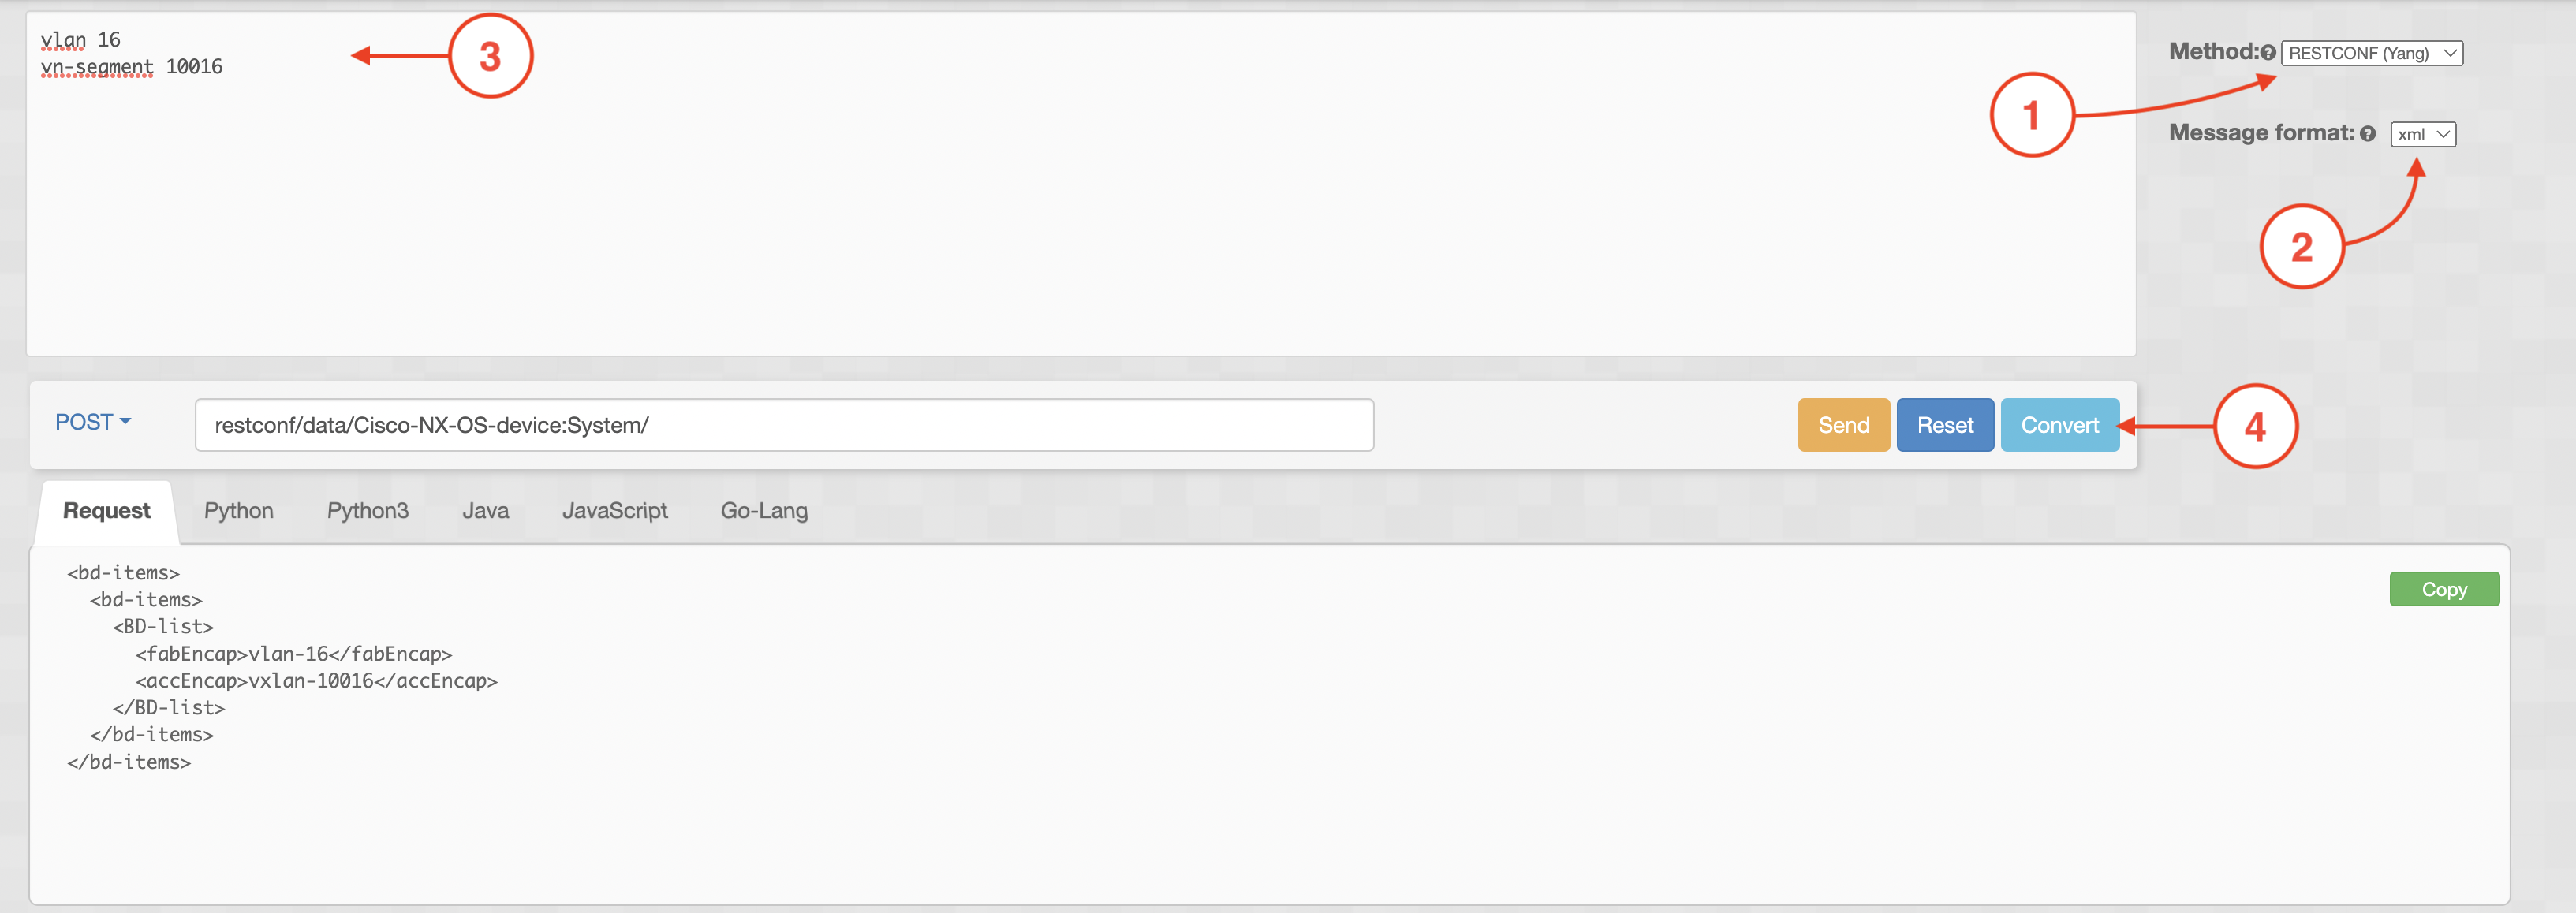
In the Sandbox, set the Method to RESTCONF (Yang) and the Message format to xml. Copy and paste the VLAN and VNI mapping below into the text field. Then, click Convert.
vlan 16
 vn-segment 10016
It is important to notice that the Sandbox is a great way to learn and work in to convert the cli you know today into YANG XML configuration templates. As you will see in the subsequent steps below, you will be taking the converted output and using it within Ansible.
Return to your Terminal window and issue pip freeze | grep ncclient:
cd /home/pod26/workspace/nxapilab
pip freeze | grep ncclient
pip freeze | grep ncclient output:
ncclient==0.7.0
ncclient is a Python library that can be leveraged for client-side scripting and application development for the NETCONF protocol. The ncclient package was automatically installed when pyats was installed earlier in the lab.
Within your existing ansible-nxos directory, create a new role for the NETCONF tasks. First change to the 'roles' subdirectory and then create a new role.
cd /home/pod26/workspace/nxapilab/ansible-nxos/roles
ansible-galaxy init nc_vlan_vni
Using the output from the Sandbox, create an XML configuration template file. You may notice the outer <config> elements
and the <System> element. The <config> element is required by NETCONF for a configuration to be made. The <System>
element includes the YANG model being used and was derived from the Sandbox as well, from the POST field.
Copy the data structure below into an XML file.
touch /home/pod26/workspace/nxapilab/ansible-nxos/roles/nc_vlan_vni/files/vlan_vni.xml
cat <<EOF >> /home/pod26/workspace/nxapilab/ansible-nxos/roles/nc_vlan_vni/files/vlan_vni.xml
<config>
<System xmlns="http://cisco.com/ns/yang/cisco-nx-os-device">
    <bd-items>
    <bd-items>
        <BD-list>
        <fabEncap>vlan-16</fabEncap>
        <accEncap>vxlan-10016</accEncap>
        </BD-list>
    </bd-items>
    </bd-items>
</System>
</config>
EOF
Ansible's netconf_config module also performs a get-config operation as part of a configuration comparison to
make the module idempotent. Copy the data structure below into an XML file.
Note: The config element is absent from the filter as this is not used for a config operation.
touch /home/pod26/workspace/nxapilab/ansible-nxos/roles/nc_vlan_vni/files/vlan_vni_filter.xml
cat <<EOF >> /home/pod26/workspace/nxapilab/ansible-nxos/roles/nc_vlan_vni/files/vlan_vni_filter.xml
<System xmlns="http://cisco.com/ns/yang/cisco-nx-os-device">
    <bd-items>
        <bd-items>
        <BD-list>
            <fabEncap>vlan-16</fabEncap>
            <accEncap>vxlan-10016</accEncap>
        </BD-list>
        </bd-items>
    </bd-items>
</System>
EOF
Create the Ansible tasks using the netconf_config and netconf_get modules. The netconf_config
module will be used to send the rpc from the XML template created in the step above and apply it to the running config. The netconf_get
module will be used to display that the configuration was applied correctly using a filter to just return the VLANs and associated VNI mappings.
Copy the playbook YAML file.
cat <<EOF >> /home/pod26/workspace/nxapilab/ansible-nxos/roles/nc_vlan_vni/tasks/main.yml

- name: CONFIGURE NX VLAN VNI MAPPING USING NETCONF
  ansible.netcommon.netconf_config:
    datastore: running
    content: "{{ lookup('file', '../files/vlan_vni.xml') }}"
    get_filter: "{{ lookup('file', '../files/vlan_vni_filter.xml') }}"

- name: SAVE CONFIGURATION
  ansible.netcommon.netconf_rpc:
    rpc: copy_running_config_src
    xmlns: "http://cisco.com/ns/yang/cisco-nx-os-device"
    content: |
     <startup-config/>

#- name: GET NX VLAN VNI MAPPING USING NETCONF
#  netconf_get:
#    display: xml
#    source: running
#    filter: <System xmlns="http://cisco.com/ns/yang/cisco-nx-os-device"><bd-items><bd-items><BD-list><fabEncap></fabEncap><accEncap></accEncap></BD-list></bd-items></bd-items></System>
#  register: output

#- debug:
#    msg: "{{ output.stdout_lines }}"

EOF
Create a new host file with a group heading called nc_leafs (nc stands for netconf) that includes your leaf switches IP addresses. This group heading will be used with a new group_vars Ansible NETCONF connection file in the next step.
Copy the nc_host file.
cat <<EOF >> /home/pod26/workspace/nxapilab/ansible-nxos/nc_hosts
# hosts file for NETCONF Ansible playbook

[nc_leafs]
10.15.26.21
10.15.26.22

EOF
Create a new Ansible connection file for NETCONF-based connections. This will use the Ansible netconf plugin.
Copy the connection YAML file.
cat <<EOF >> /home/pod26/workspace/nxapilab/ansible-nxos/group_vars/nc_leafs.yml
---
ansible_connection: ansible.netcommon.netconf
ansible_network_os: cisco.nxos.nxos
ansible_user: admin
ansible_password: cisco.123

EOF
Create a new main playbook that associates the nc_leafs host grouping and the nc_vlan_vni role.
Copy the main playbook YAML file.
cat <<EOF >> /home/pod26/workspace/nxapilab/ansible-nxos/nc_playbook.yml

---
# main playbook

- hosts: nc_leafs
  gather_facts: False
  roles:
  - role: nc_vlan_vni

EOF
Execute the Ansible playbook:
cd /home/pod26/workspace/nxapilab/ansible-nxos
ansible-playbook -i nc_hosts nc_playbook.yml
Alternatively, you can add -vvv for verbose debugging output for each task that is executed.
Upon successful execution of this playbook, a new VLAN and VNI mapping will be applied to your leaf switches. You can confirm this two ways:
    PLAY [nc_leafs] *************************************************************************************************************************************************************************

    TASK [nc_vlan_vni : CONFIGURE NX VLAN VNI MAPPING USING NETCONF] ****************************************************************************************************************************************
    changed: [10.15.26.21]
    changed: [10.15.26.22]

    TASK [nc_vlan_vni : SAVE CONFIGURATION] ****************************************************************************************************************************************
    ok: [10.15.26.21]
    ok: [10.15.26.22]

    PLAY RECAP **************************************************************************************************************************************************************************************
    10.15.26.21                 : ok=2    changed=1    unreachable=0    failed=0    skipped=0    rescued=0    ignored=0
    10.15.26.22                 : ok=2    changed=1    unreachable=0    failed=0    skipped=0    rescued=0    ignored=0