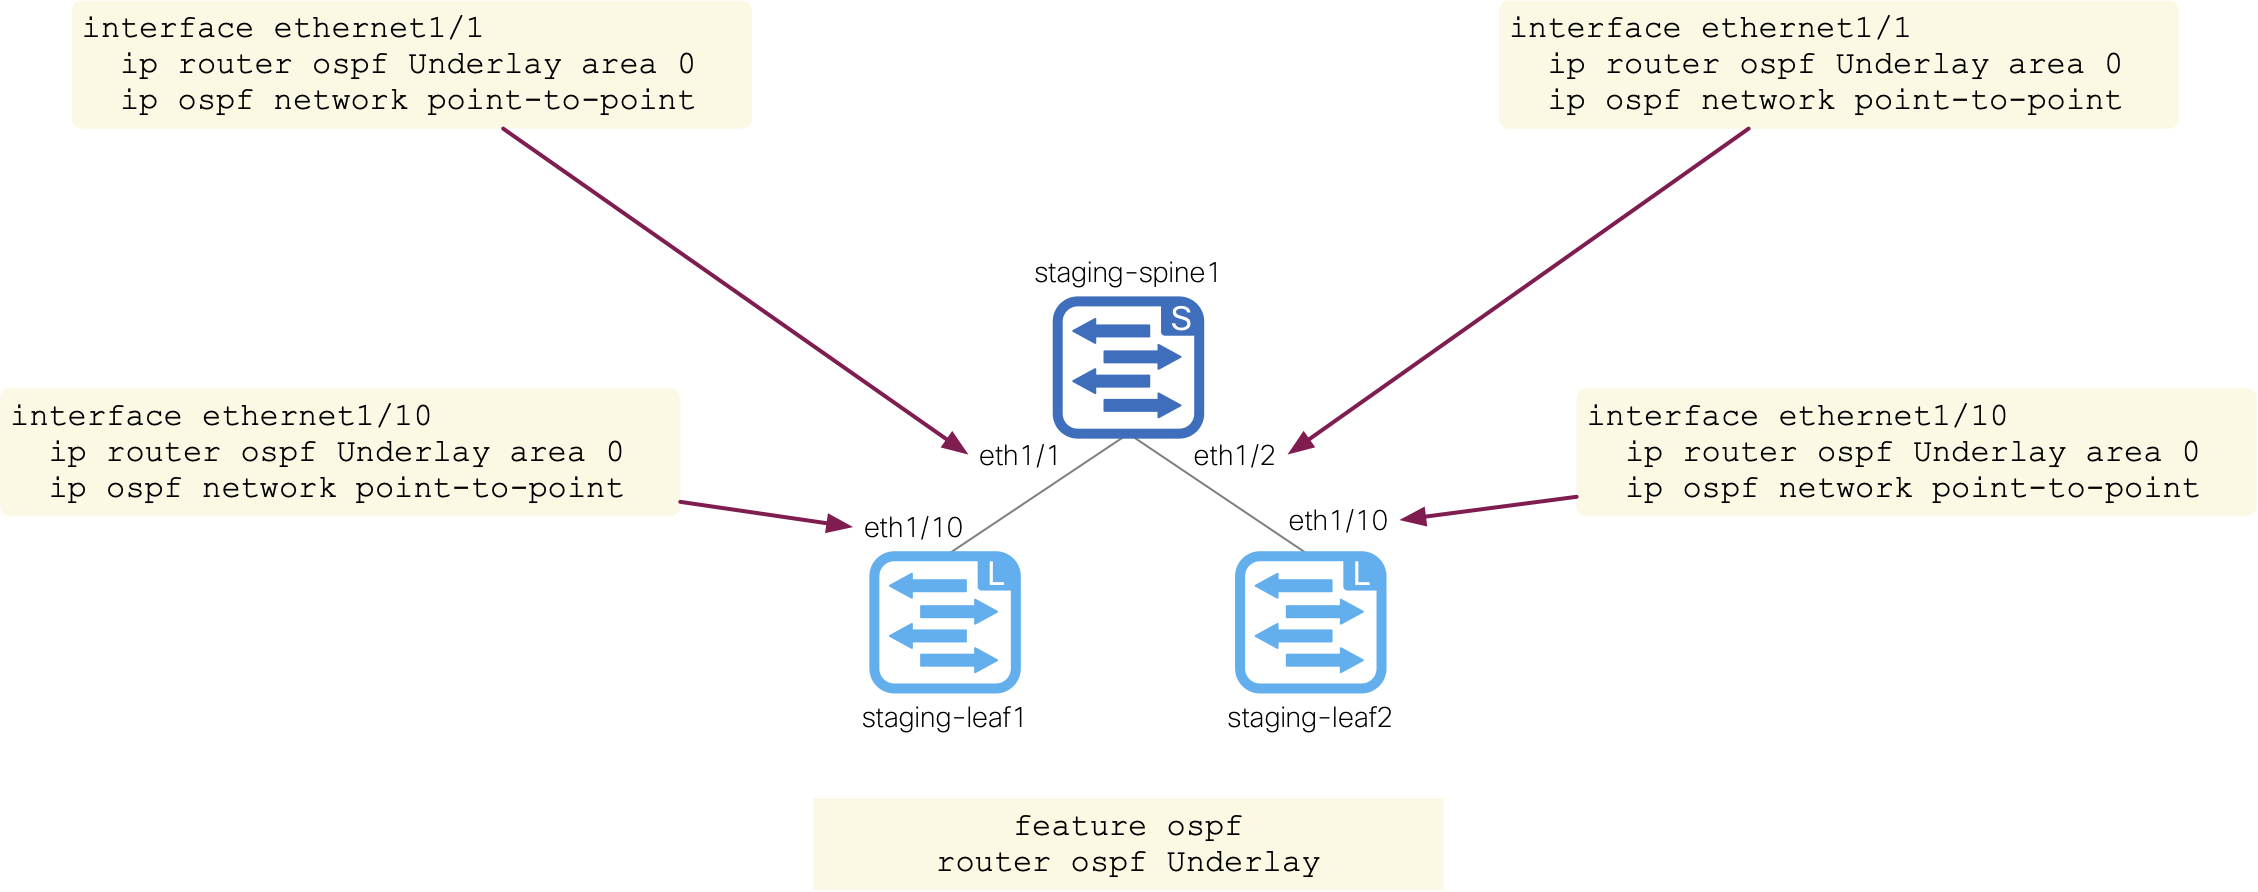
This section is very similar to the NX-API JSON section you just completed. The key difference is the usage of JSON-RPC and how the payload is generated. You will use JSON-RPC payloads in your requests to configure an OSPF process and OSPF Ethernet interfaces for the Underlay in your staging fabric.
In your VSCode Terminal, let's make use of the code keyword to open another new file for creating a Python NX-API CLI JSON-RPC script:
touch /home/pod01/workspace/nxapilab/scripts/nxapi_cli_jsonrpc.py
code-server -r /home/pod01/workspace/nxapilab/scripts/nxapi_cli_jsonrpc.py
In your VSCode, a new file should now be open called nxapi_cli_jsonrpc.py.
In your new Python file, you need to import the same packages as before. Either copy or type the import statements below and place them at the top of your Python file.
import argparse
import pathlib
import sys
import jinja2
import yaml
import json
import requests


requests.packages.urllib3.disable_warnings()
The function definition below, like in the previous section, is used to dynamically generate your JSON-RPC configuration payload and adheres to the NXAPI CLI JSON-RPC interface's payload structure.
The function definition, nxapi_payload_builder, takes a single argument, commands, which is the raw, line for line cli commands that you know today
and breaks them apart line by line into a list of strings for each command. The cli commands are generated from a Jinja template file that you will define later in this section.
The list of string commands is then iterated over in a for loop and added to the JSON-RPC structure as the value for the key cmd.
The for loop also uses the enumerate method to create an enumerate count object.
The enumerate count object is used to create the id key value pair in the JSON-RPC payload and is used to identify the order of the commands in the payload.
Each iteration of the for loop will append the JSON-RPC payload to a list object, payload, which is returned at the end of the function.
Either copy or type the code below and place it next into your Python file.
def nxapi_payload(commands):
    payload = []

    for id, cmd in enumerate(commands):
        jsonrpc_template = {
            "jsonrpc": "2.0",
            "method": "cli",
            "params": {
                "cmd": cmd,
                "version": 1
            },
            "id": id + 1,
            "rollback": "rollback-on-error"
        }
        payload.append(jsonrpc_template)

    return payload
After nxapi_payload_builder, this next function is identical to the nxapi_post function used in nxapi_cli_json.py.
The difference in how this function is invoked comes down to the headers passed for JSON-RPC. This will be set in the next step.
Either copy or type the code below and place it next into your Python file.
def nxapi_post(url, headers, payload, username, password):
    try:
        print(f"Payload sent to {url}:")
        print(json.dumps(payload, indent=2))
        print()
        response = requests.post(url, json=payload, headers=headers, auth=(username, password), verify=False)
        print(f"Response from {url}:")
        if response.ok:
            print(json.dumps(response.json(), indent=2))
            print()
            return response.json()
        else:
            print("Error! " + str(response.status_code))
            print()
            SystemExit(e)
    except requests.exceptions.RequestException as e:
        raise SystemExit(e)
After you have successfully created your function definitions, it's time to create the main method, that is the entry point for your Python script.
It will perform the function calls you just defined based on your command line arguments. The first part of the code below will use argparse
to define these command line arguments with subsequent if condition checks to ensure the proper file types are being used.
If the proper file types are used, the code will then open the data file and load the contents into a Python dictionary using the yaml.safe_load() function.
Additionally, the code will open the Jinja template file, which is to be defined in the next step, and load the contents into a variable called template.
The authentication credential variables for the switches are also defined by referencing the dictionary keys and values from the data file.
The REST header is also defined as a dictionary with the key/value pair of {'content-type': 'application/json-rpc'} since you are working with the NXAPI CLI JSON-RPC interface.
The last section of the code, is how you iterate over the switches defined in your data file that make up your staging fabric.
This is done by again referencing the dictionary keys and values from the data file down to the switches key.
Then using the .keys() dictionary method to iterate over the dictionary keys, which are the switch names.
Using the data for each switch, the code will then render the Jinja template using the template.render() function.
However, this time, the usage of template.render() differs slightly;
two variables, defaults and switch are passed to the template as dictionary objects using the keys from your data file.
What this means is that the defaults variable is a dictionary that has your data file defaults and for each iteration in the for loop,
the switch variable is a dictionary that has the data file switch specific data.
This renders the raw CLI that you know today using the Jinja template that is to be defined in the next step.
The NXAPI CLI JSON-RPC payload is then generated using the nxapi_payload_builder function you defined earlier; again this function will
take the raw CLI and generate the semi-colon separated string of commands that is used as the input in the payload.
Lastly, the switch(s) REST interface is called using the nxapi_post function you also defined earlier,
where this function takes the URL, header, payload, and authentication credentials as arguments to configure the switch via the NXAPI CLI JSON-RPC interface.
Either copy or type the code below and place it next into your Python file.
def main():
    parser = argparse.ArgumentParser()

    parser.add_argument("-d", "--data", type=pathlib.Path)
    parser.add_argument("-t", "--template", type=pathlib.Path)
    parser.add_argument("--version", action="version", version="%(prog)s 0.1.0")

    args = parser.parse_args()

    if args.data.suffix in (".yaml", ".yml"):
        with open(args.data) as f:
            data = yaml.safe_load(f)
    else:
        sys.exit(f"{args.data.suffix} is not a supported file format.")

    if args.template.suffix != ".j2":
        sys.exit(f"{args.template.suffix} is not a supported template format.")

    with open(args.template) as f:
        template = jinja2.Template(f.read())

    username = data['fabric']['defaults']['credentials']['username']
    password = data['fabric']['defaults']['credentials']['password']
    headers = {'content-type': 'application/json-rpc'}

    for switch in data['fabric']['switches'].keys():
        url = f"https://{data['fabric']['switches'][switch]['mgmt']}/ins"

        commands = template.render(defaults=data['fabric']['defaults'], switch=data['fabric']['switches'][switch])
        commands = [command.strip() for command in commands.splitlines()]
        payload = nxapi_payload(commands)
        nxapi_post(url, headers, payload, username, password)


if __name__ == '__main__':
    main()
With your Python script defined, it's time to create the Jinja template file that will be used to generate the OSPF configuration for each switch in your fabric. Once again, the Jinja template will be driven by the data file you defined in the first section.
However, this time, the key takeaway from this Jinja template is how to combine using the template with fabric-wide or network-wide defaults vs switch specific data. Jinja offers a default keyword that can be used to define a default value for a variable given one does not exist, such as in the case of a switch specific variable.
Much like the previous interface Jinja template, if conditions are used to determine what configuration to generate based on the data file.
To start, if the defaults['ospf'] or switch['ospf'] (switch specific OSPF data) key exists in the data file,
then the OSPF process and area will be configured using the values defined in the data file, otherwise, this template will not generate any OSPF configuration.
Next, how to set a Jinja variable, ospf, is performed to determine if there is switch specific OSPF data defined in the data file and if not, set a None value.
If there is switch specific OSPF data defined in the data file, then the ospf variable will be used to set the router OSPF process otherwise,
it will fallback to using the default values as annotated by the pipe then Jinja default keyword; ospf['process'] | default(defaults['ospf']['process']).
The router-id is derived from the specific switch.
Lastly, a for loop is used to iterate over each switch's interfaces and based on the port_type being defined as routed,
will create the configuration with the OSPF process and area defined in the data file, either specific to the switch's interface or using the data file defaults.
touch /home/pod01/workspace/nxapilab/scripts/templates/ospf.j2
cat <<EOF >> /home/pod01/workspace/nxapilab/scripts/templates/ospf.j2
{% if defaults['ospf'] or switch['ospf'] -%}
feature ospf
{% set ospf = switch.get('ospf', None) -%}
router ospf {{ ospf['process'] | default(defaults['ospf']['process']) }}
router-id {{ switch['router_id'] }}
{% for interface in switch['interfaces'] -%}
interface {{ interface['name'] }}
{% if interface['port_type'] == "routed" -%}
ip router ospf {{ ospf['process'] | default(defaults['ospf']['process']) }} area {{ ospf['area'] | default(defaults['ospf']['area']) }}
ip ospf network {{ ospf['network_type'] | default(defaults['ospf']['network_type']) }}
{% endif -%}
{% endfor -%}
{% endif -%}
EOF
Return to the VSCode Terminal command line to execute your code using:
python nxapi_cli_jsonrpc.py --data=data.yaml --template=templates/ospf.j2
Printed below is the code execution on the switches in your staging fabric; you can see the JSON-RPC payload sent to the switch(s) and the response from the switch(s):
Make note of the payload list and how each entry for cmd is a single command that were generated and split into a list from the Jinja template.
[
  {
    "jsonrpc": "2.0",
    "method": "cli",
    "params": {
      "cmd": "feature ospf",
      "version": 1
    },
    "id": 1,
    "rollback": "rollback-on-error"
  },
  {
    "jsonrpc": "2.0",
    "method": "cli",
    "params": {
      "cmd": "router ospf UNDERLAY",
      "version": 1
    },
    "id": 2,
    "rollback": "rollback-on-error"
  },
  {
    "jsonrpc": "2.0",
    "method": "cli",
    "params": {
      "cmd": "router-id 10.0.0.1",
      "version": 1
    },
    "id": 3,
    "rollback": "rollback-on-error"
  },
  {
    "jsonrpc": "2.0",
    "method": "cli",
    "params": {
      "cmd": "interface Ethernet1/1",
      "version": 1
    },
    "id": 4,
    "rollback": "rollback-on-error"
  },
  {
    "jsonrpc": "2.0",
    "method": "cli",
    "params": {
      "cmd": "ip router ospf UNDERLAY area 0.0.0.0",
      "version": 1
    },
    "id": 5,
    "rollback": "rollback-on-error"
  },
  {
    "jsonrpc": "2.0",
    "method": "cli",
    "params": {
      "cmd": "ip ospf network point-to-point",
      "version": 1
    },
    "id": 6,
    "rollback": "rollback-on-error"
  },
  {
    "jsonrpc": "2.0",
    "method": "cli",
    "params": {
      "cmd": "interface Ethernet1/2",
      "version": 1
    },
    "id": 7,
    "rollback": "rollback-on-error"
  },
  {
    "jsonrpc": "2.0",
    "method": "cli",
    "params": {
      "cmd": "ip router ospf UNDERLAY area 0.0.0.0",
      "version": 1
    },
    "id": 8,
    "rollback": "rollback-on-error"
  },
  {
    "jsonrpc": "2.0",
    "method": "cli",
    "params": {
      "cmd": "ip ospf network point-to-point",
      "version": 1
    },
    "id": 9,
    "rollback": "rollback-on-error"
  },
  {
    "jsonrpc": "2.0",
    "method": "cli",
    "params": {
      "cmd": "interface Ethernet1/3",
      "version": 1
    },
    "id": 10,
    "rollback": "rollback-on-error"
  },
  {
    "jsonrpc": "2.0",
    "method": "cli",
    "params": {
      "cmd": "ip router ospf UNDERLAY area 0.0.0.0",
      "version": 1
    },
    "id": 11,
    "rollback": "rollback-on-error"
  },
  {
    "jsonrpc": "2.0",
    "method": "cli",
    "params": {
      "cmd": "ip ospf network point-to-point",
      "version": 1
    },
    "id": 12,
    "rollback": "rollback-on-error"
  }
]
[
  {
    "jsonrpc": "2.0",
    "result": null,
    "id": 1
  },
  {
    "jsonrpc": "2.0",
    "result": null,
    "id": 2
  },
  {
    "jsonrpc": "2.0",
    "result": null,
    "id": 3
  },
  {
    "jsonrpc": "2.0",
    "result": null,
    "id": 4
  },
  {
    "jsonrpc": "2.0",
    "result": null,
    "id": 5
  },
  {
    "jsonrpc": "2.0",
    "result": null,
    "id": 6
  },
  {
    "jsonrpc": "2.0",
    "result": null,
    "id": 7
  },
  {
    "jsonrpc": "2.0",
    "result": null,
    "id": 8
  },
  {
    "jsonrpc": "2.0",
    "result": null,
    "id": 9
  },
  {
    "jsonrpc": "2.0",
    "result": null,
    "id": 10
  },
  {
    "jsonrpc": "2.0",
    "result": null,
    "id": 11
  },
  {
    "jsonrpc": "2.0",
    "result": null,
    "id": 12
  }
]
[
  {
    "jsonrpc": "2.0",
    "method": "cli",
    "params": {
      "cmd": "feature ospf",
      "version": 1
    },
    "id": 1,
    "rollback": "rollback-on-error"
  },
  {
    "jsonrpc": "2.0",
    "method": "cli",
    "params": {
      "cmd": "router ospf UNDERLAY",
      "version": 1
    },
    "id": 2,
    "rollback": "rollback-on-error"
  },
  {
    "jsonrpc": "2.0",
    "method": "cli",
    "params": {
      "cmd": "router-id 10.0.0.2",
      "version": 1
    },
    "id": 3,
    "rollback": "rollback-on-error"
  },
  {
    "jsonrpc": "2.0",
    "method": "cli",
    "params": {
      "cmd": "interface Ethernet1/1",
      "version": 1
    },
    "id": 4,
    "rollback": "rollback-on-error"
  },
  {
    "jsonrpc": "2.0",
    "method": "cli",
    "params": {
      "cmd": "ip router ospf UNDERLAY area 0.0.0.0",
      "version": 1
    },
    "id": 5,
    "rollback": "rollback-on-error"
  },
  {
    "jsonrpc": "2.0",
    "method": "cli",
    "params": {
      "cmd": "ip ospf network point-to-point",
      "version": 1
    },
    "id": 6,
    "rollback": "rollback-on-error"
  },
  {
    "jsonrpc": "2.0",
    "method": "cli",
    "params": {
      "cmd": "interface Ethernet1/2",
      "version": 1
    },
    "id": 7,
    "rollback": "rollback-on-error"
  },
  {
    "jsonrpc": "2.0",
    "method": "cli",
    "params": {
      "cmd": "ip router ospf UNDERLAY area 0.0.0.0",
      "version": 1
    },
    "id": 8,
    "rollback": "rollback-on-error"
  },
  {
    "jsonrpc": "2.0",
    "method": "cli",
    "params": {
      "cmd": "ip ospf network point-to-point",
      "version": 1
    },
    "id": 9,
    "rollback": "rollback-on-error"
  },
  {
    "jsonrpc": "2.0",
    "method": "cli",
    "params": {
      "cmd": "interface Ethernet1/3",
      "version": 1
    },
    "id": 10,
    "rollback": "rollback-on-error"
  },
  {
    "jsonrpc": "2.0",
    "method": "cli",
    "params": {
      "cmd": "ip router ospf UNDERLAY area 0.0.0.0",
      "version": 1
    },
    "id": 11,
    "rollback": "rollback-on-error"
  },
  {
    "jsonrpc": "2.0",
    "method": "cli",
    "params": {
      "cmd": "ip ospf network point-to-point",
      "version": 1
    },
    "id": 12,
    "rollback": "rollback-on-error"
  }
]
[
  {
    "jsonrpc": "2.0",
    "result": null,
    "id": 1
  },
  {
    "jsonrpc": "2.0",
    "result": null,
    "id": 2
  },
  {
    "jsonrpc": "2.0",
    "result": null,
    "id": 3
  },
  {
    "jsonrpc": "2.0",
    "result": null,
    "id": 4
  },
  {
    "jsonrpc": "2.0",
    "result": null,
    "id": 5
  },
  {
    "jsonrpc": "2.0",
    "result": null,
    "id": 6
  },
  {
    "jsonrpc": "2.0",
    "result": null,
    "id": 7
  },
  {
    "jsonrpc": "2.0",
    "result": null,
    "id": 8
  },
  {
    "jsonrpc": "2.0",
    "result": null,
    "id": 9
  },
  {
    "jsonrpc": "2.0",
    "result": null,
    "id": 10
  },
  {
    "jsonrpc": "2.0",
    "result": null,
    "id": 11
  },
  {
    "jsonrpc": "2.0",
    "result": null,
    "id": 12
  }
]
[
  {
    "jsonrpc": "2.0",
    "method": "cli",
    "params": {
      "cmd": "feature ospf",
      "version": 1
    },
    "id": 1,
    "rollback": "rollback-on-error"
  },
  {
    "jsonrpc": "2.0",
    "method": "cli",
    "params": {
      "cmd": "router ospf UNDERLAY",
      "version": 1
    },
    "id": 2,
    "rollback": "rollback-on-error"
  },
  {
    "jsonrpc": "2.0",
    "method": "cli",
    "params": {
      "cmd": "router-id 10.0.0.101",
      "version": 1
    },
    "id": 3,
    "rollback": "rollback-on-error"
  },
  {
    "jsonrpc": "2.0",
    "method": "cli",
    "params": {
      "cmd": "interface Ethernet1/1",
      "version": 1
    },
    "id": 4,
    "rollback": "rollback-on-error"
  },
  {
    "jsonrpc": "2.0",
    "method": "cli",
    "params": {
      "cmd": "ip router ospf UNDERLAY area 0.0.0.0",
      "version": 1
    },
    "id": 5,
    "rollback": "rollback-on-error"
  },
  {
    "jsonrpc": "2.0",
    "method": "cli",
    "params": {
      "cmd": "ip ospf network point-to-point",
      "version": 1
    },
    "id": 6,
    "rollback": "rollback-on-error"
  },
  {
    "jsonrpc": "2.0",
    "method": "cli",
    "params": {
      "cmd": "interface Ethernet1/2",
      "version": 1
    },
    "id": 7,
    "rollback": "rollback-on-error"
  },
  {
    "jsonrpc": "2.0",
    "method": "cli",
    "params": {
      "cmd": "ip router ospf UNDERLAY area 0.0.0.0",
      "version": 1
    },
    "id": 8,
    "rollback": "rollback-on-error"
  },
  {
    "jsonrpc": "2.0",
    "method": "cli",
    "params": {
      "cmd": "ip ospf network point-to-point",
      "version": 1
    },
    "id": 9,
    "rollback": "rollback-on-error"
  }
]
[
  {
    "jsonrpc": "2.0",
    "result": null,
    "id": 1
  },
  {
    "jsonrpc": "2.0",
    "result": null,
    "id": 2
  },
  {
    "jsonrpc": "2.0",
    "result": null,
    "id": 3
  },
  {
    "jsonrpc": "2.0",
    "result": null,
    "id": 4
  },
  {
    "jsonrpc": "2.0",
    "result": null,
    "id": 5
  },
  {
    "jsonrpc": "2.0",
    "result": null,
    "id": 6
  },
  {
    "jsonrpc": "2.0",
    "result": null,
    "id": 7
  },
  {
    "jsonrpc": "2.0",
    "result": null,
    "id": 8
  },
  {
    "jsonrpc": "2.0",
    "result": null,
    "id": 9
  }
]
[
  {
    "jsonrpc": "2.0",
    "method": "cli",
    "params": {
      "cmd": "feature ospf",
      "version": 1
    },
    "id": 1,
    "rollback": "rollback-on-error"
  },
  {
    "jsonrpc": "2.0",
    "method": "cli",
    "params": {
      "cmd": "router ospf UNDERLAY",
      "version": 1
    },
    "id": 2,
    "rollback": "rollback-on-error"
  },
  {
    "jsonrpc": "2.0",
    "method": "cli",
    "params": {
      "cmd": "router-id 10.0.0.102",
      "version": 1
    },
    "id": 3,
    "rollback": "rollback-on-error"
  },
  {
    "jsonrpc": "2.0",
    "method": "cli",
    "params": {
      "cmd": "interface Ethernet1/1",
      "version": 1
    },
    "id": 4,
    "rollback": "rollback-on-error"
  },
  {
    "jsonrpc": "2.0",
    "method": "cli",
    "params": {
      "cmd": "ip router ospf UNDERLAY area 0.0.0.0",
      "version": 1
    },
    "id": 5,
    "rollback": "rollback-on-error"
  },
  {
    "jsonrpc": "2.0",
    "method": "cli",
    "params": {
      "cmd": "ip ospf network point-to-point",
      "version": 1
    },
    "id": 6,
    "rollback": "rollback-on-error"
  },
  {
    "jsonrpc": "2.0",
    "method": "cli",
    "params": {
      "cmd": "interface Ethernet1/2",
      "version": 1
    },
    "id": 7,
    "rollback": "rollback-on-error"
  },
  {
    "jsonrpc": "2.0",
    "method": "cli",
    "params": {
      "cmd": "ip router ospf UNDERLAY area 0.0.0.0",
      "version": 1
    },
    "id": 8,
    "rollback": "rollback-on-error"
  },
  {
    "jsonrpc": "2.0",
    "method": "cli",
    "params": {
      "cmd": "ip ospf network point-to-point",
      "version": 1
    },
    "id": 9,
    "rollback": "rollback-on-error"
  }
]
[
  {
    "jsonrpc": "2.0",
    "result": null,
    "id": 1
  },
  {
    "jsonrpc": "2.0",
    "result": null,
    "id": 2
  },
  {
    "jsonrpc": "2.0",
    "result": null,
    "id": 3
  },
  {
    "jsonrpc": "2.0",
    "result": null,
    "id": 4
  },
  {
    "jsonrpc": "2.0",
    "result": null,
    "id": 5
  },
  {
    "jsonrpc": "2.0",
    "result": null,
    "id": 6
  },
  {
    "jsonrpc": "2.0",
    "result": null,
    "id": 7
  },
  {
    "jsonrpc": "2.0",
    "result": null,
    "id": 8
  },
  {
    "jsonrpc": "2.0",
    "result": null,
    "id": 9
  }
]
[
  {
    "jsonrpc": "2.0",
    "method": "cli",
    "params": {
      "cmd": "feature ospf",
      "version": 1
    },
    "id": 1,
    "rollback": "rollback-on-error"
  },
  {
    "jsonrpc": "2.0",
    "method": "cli",
    "params": {
      "cmd": "router ospf UNDERLAY",
      "version": 1
    },
    "id": 2,
    "rollback": "rollback-on-error"
  },
  {
    "jsonrpc": "2.0",
    "method": "cli",
    "params": {
      "cmd": "router-id 10.0.0.103",
      "version": 1
    },
    "id": 3,
    "rollback": "rollback-on-error"
  },
  {
    "jsonrpc": "2.0",
    "method": "cli",
    "params": {
      "cmd": "interface Ethernet1/1",
      "version": 1
    },
    "id": 4,
    "rollback": "rollback-on-error"
  },
  {
    "jsonrpc": "2.0",
    "method": "cli",
    "params": {
      "cmd": "ip router ospf UNDERLAY area 0.0.0.0",
      "version": 1
    },
    "id": 5,
    "rollback": "rollback-on-error"
  },
  {
    "jsonrpc": "2.0",
    "method": "cli",
    "params": {
      "cmd": "ip ospf network point-to-point",
      "version": 1
    },
    "id": 6,
    "rollback": "rollback-on-error"
  },
  {
    "jsonrpc": "2.0",
    "method": "cli",
    "params": {
      "cmd": "interface Ethernet1/2",
      "version": 1
    },
    "id": 7,
    "rollback": "rollback-on-error"
  },
  {
    "jsonrpc": "2.0",
    "method": "cli",
    "params": {
      "cmd": "ip router ospf UNDERLAY area 0.0.0.0",
      "version": 1
    },
    "id": 8,
    "rollback": "rollback-on-error"
  },
  {
    "jsonrpc": "2.0",
    "method": "cli",
    "params": {
      "cmd": "ip ospf network point-to-point",
      "version": 1
    },
    "id": 9,
    "rollback": "rollback-on-error"
  }
]
[
  {
    "jsonrpc": "2.0",
    "result": null,
    "id": 1
  },
  {
    "jsonrpc": "2.0",
    "result": null,
    "id": 2
  },
  {
    "jsonrpc": "2.0",
    "result": null,
    "id": 3
  },
  {
    "jsonrpc": "2.0",
    "result": null,
    "id": 4
  },
  {
    "jsonrpc": "2.0",
    "result": null,
    "id": 5
  },
  {
    "jsonrpc": "2.0",
    "result": null,
    "id": 6
  },
  {
    "jsonrpc": "2.0",
    "result": null,
    "id": 7
  },
  {
    "jsonrpc": "2.0",
    "result": null,
    "id": 8
  },
  {
    "jsonrpc": "2.0",
    "result": null,
    "id": 9
  }
]
Continue to next section for using NX-API REST in a similar Python script to perform PIM configuration based on your data file for switches in your staging fabric.