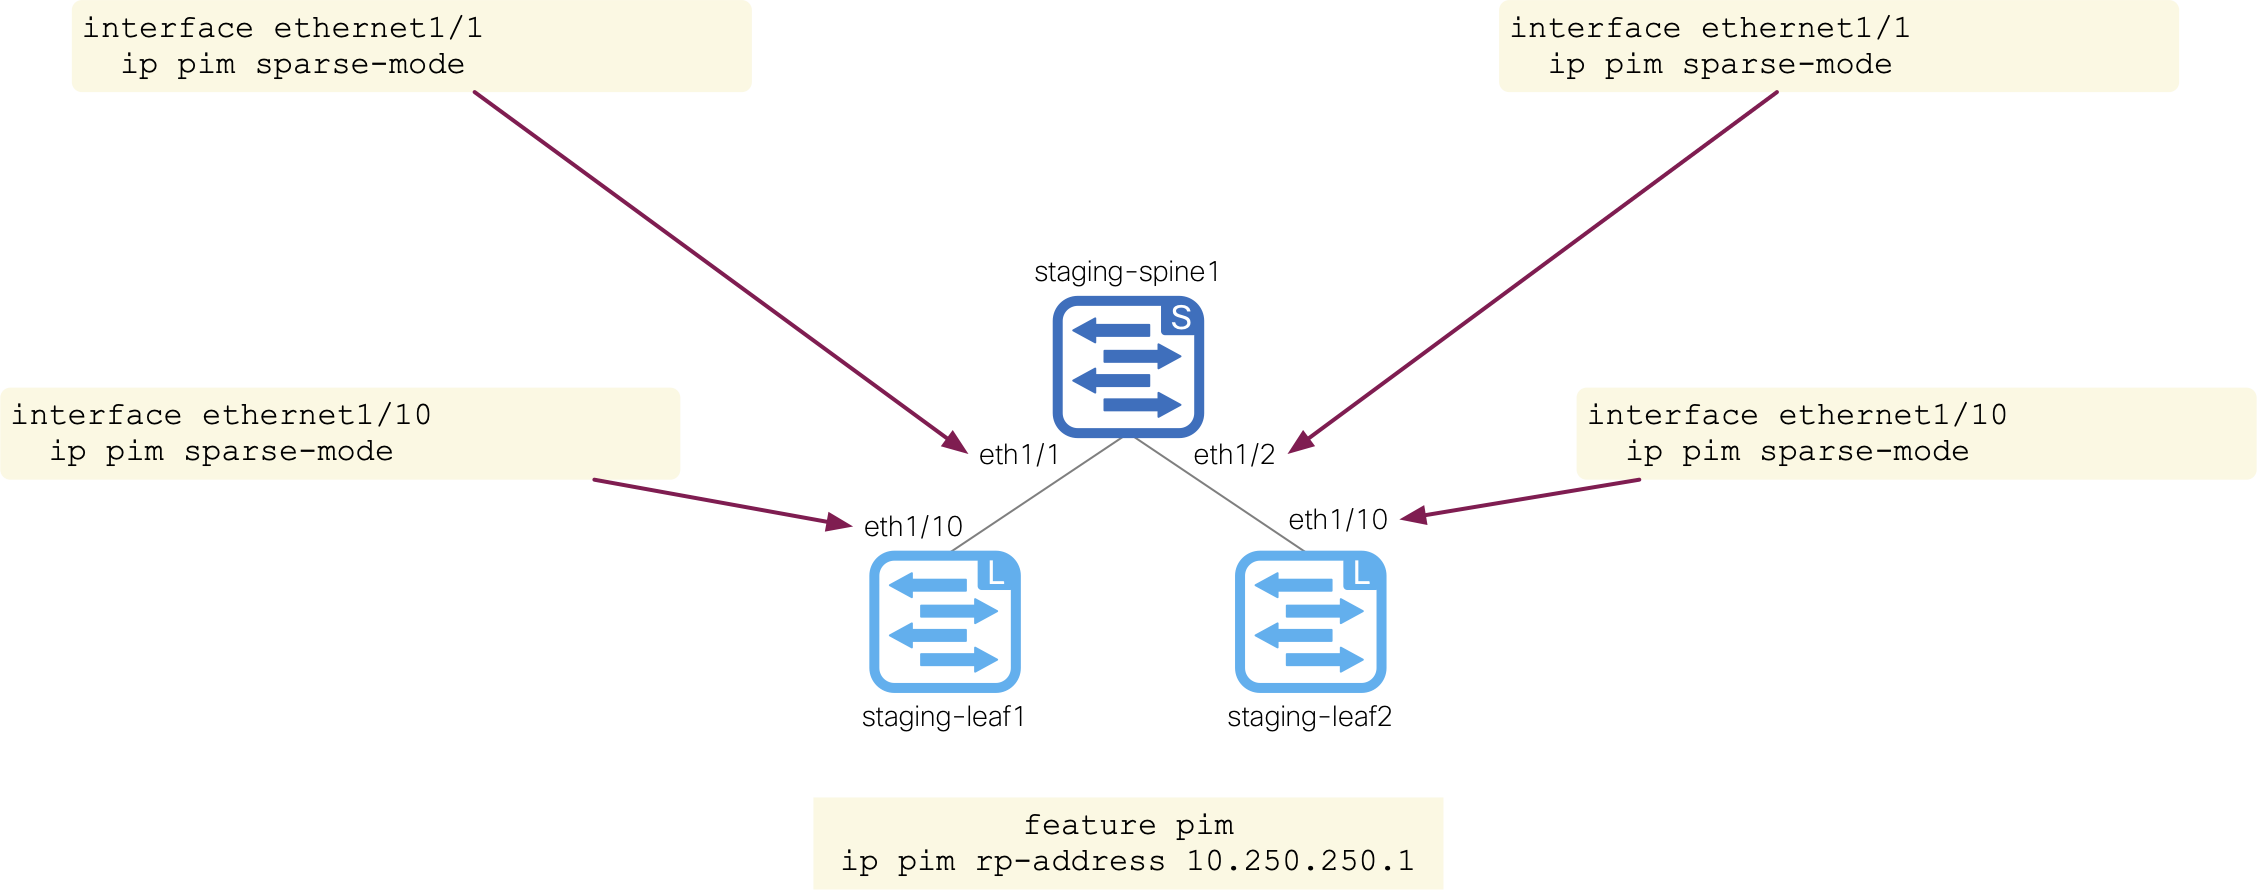
In this section you are going to write the Python code to configure PIM Sparse-Mode on the Ethernet interfaces and configure the Rendezvous Point (RP) to allow data-plane Broadcast, Unknown Unicast, and Multicast (BUM) traffic to leverage multicast in the Underlay and control-plane using NX-API REST. This section will require some additional functions to connect and disconnect from the switches using NX-API REST. Additionally, you will need to create a template to configure PIM Sparse-Mode on the Ethernet interfaces and RP using Jinja templating as done in the previous sections.
In your VSCode Terminal, let's make use of the code keyword to open another new file for creating a Python NX-API REST script:
touch /home/pod01/workspace/nxapilab/scripts/nxapi_rest.py
code-server -r /home/pod01/workspace/nxapilab/scripts/nxapi_rest.py
In your VSCode, a new file should now be open called nxapi_rest.py.
In your new Python file, you need to import the same packages as before. Either copy or type the import statements below and place them at the top of your Python file.
import argparse
import pathlib
import sys
import jinja2
import yaml
import json
import requests


requests.packages.urllib3.disable_warnings()
Copy or type the function definition that contains the aaaUser object for logging in and obtaining an authentication token.
The function below makes use of the aaaLogin class and takes the parameters for the username, password, ip_addr of the switch.
The request here is also done slightly different than in the previous NX-API CLI section to give you exposure to a different way to use the request library.
Instead of using requests.post(), you can also make use of requests.request(). This requires you to pass the CRUD operation; below it's a "POST" to send the authentication payload.
You still are required to pass the url and payload as parameters.
Just to recap, whenever you make a call using requests, you are creating a Request object which sends a request/query off to the switch(s). Also, a Response object is generated when the Request object gets a reply. The response is stored in the response variable below as a JSON dictionary that could be manipulated as a Python dictionary. The response contains the authentication token that is parsed out by loading the response and indexing the dictionary based on the keys and list location to get the token value. The token is then placed into a auth_cookie dictionary and returned. Subsequent requests can make use of this token to perform CRUD operations.
def aaa_login(username, password, ip_addr):
    payload = {
        'aaaUser': {
            'attributes': {
                'name': username,
                'pwd': password
                }
            }
        }
    url = f"https://{ip_addr}/api/mo/aaaLogin.json"
    auth_cookie = {}

    try:
        response = requests.request("POST", url, json=payload, verify=False)
        if response.status_code == requests.codes.ok:
            data = json.loads(response.text)['imdata'][0]
            token = str(data['aaaLogin']['attributes']['token'])
            auth_cookie = {"APIC-cookie": token}

        print(f"aaaLogin RESPONSE from {ip_addr}:")
        print(json.dumps(json.loads(response.text)))
        print()

        return response.status_code, auth_cookie
    except requests.exceptions.RequestException as e:
        raise SystemExit(e)
After the aaa_login function definition, copy or type the function definition that contains the aaaUser object for logging out.
The function below makes use of the aaaLogout class and takes the parameters for the username, password, ip_addr of the switch. The request here uses request.request().
Again, this requires you to pass the CRUD operation. You still are required to pass the url and payload as parameters.
Notice, you also have to use the auth_cookie you obtained from the aaa_login function.
def aaa_logout(username, ip_addr, auth_cookie):
    payload = {
        'aaaUser': {
            'attributes': {
                'name': username
                }
            }
        }
    url = f"https://{ip_addr}/api/mo/aaaLogout.json"

    try:
        response = requests.request("POST", url, json=payload, cookies=auth_cookie, verify=False)

        print(f"aaaLogout RESPONSE from {ip_addr}:")
        print(json.dumps(json.loads(response.text)))
        print()
    except requests.exceptions.RequestException as e:
        raise SystemExit(e)
After the aaa_logout function definition, copy or type the function definition that will be used to perform the actual POST request to the switch(s) REST interface.
As with the aaa functions, you will make use of requests.request().
The function takes the parameters for the url, ip_addr of the switch, payload, and the auth_cookie obtained from aaa_login.
For the auth_cookie parameter, the aaa_login function must be called and executed before nxapi_post since you need the authentication token.
def nxapi_post(url, auth_cookie, payload):
    try:
        print(f"Payload sent to {url}:")
        print(payload)
        response = requests.request("POST", url, json=json.loads(payload), cookies=auth_cookie, verify=False)

        print("POST RESPONSE:")
        print(json.dumps(json.loads(response.text)))
        print()
    except requests.exceptions.RequestException as e:
        raise SystemExit(e)
After you have successfully created your function definitions, it's time to create the main method, that is the entry point for your Python script.
It will perform the function calls you just defined based on your command line arguments. The first part of the code below will use argparse
to define these command line arguments with subsequent if condition checks to ensure the proper file types are being used.
If the proper file types are used, the code will then open the data file and load the contents into a Python dictionary using the yaml.safe_load() function.
Additionally, the code will open the Jinja template file, which is to be defined in the next step, and load the contents into a variable called template.
The authentication credential variables for the switches are also defined by referencing the dictionary keys and values from the data file.
The last section of the code is similar to the previous JSON-RPC section.
You iterate over the switches defined in your data file that make up your staging fabric by referencing the dictionary keys and values from the data file down to the switches key.
Then using the .keys() dictionary method to iterate over the dictionary keys, which are the switch names.
Using the data for each switch, the code will then render the Jinja template using the template.render() function.
Like the previous section, the usage of template.render() passes two variables, defaults and switch,
that is your data defaults dictionary and based on where you are in the for loop for each switch, it passes the switch specific dictionary data to the template from your data file.
This template does not render raw CLI as in the previous sections since you are working with NXAPI REST.
Instead it leverages the JSON Jinja template that you will define in the next step to generate the PIM JSON payload to be sent to a switch over each for loop iteration via the nxapi_post function.
Lastly, the code will call the aaa_logout function to log out of the switch.
Either copy or type the code below and place it next into your Python file.
def main():
    parser = argparse.ArgumentParser()

    parser.add_argument("-d", "--data", type=pathlib.Path)
    parser.add_argument("-t", "--template", type=pathlib.Path)
    parser.add_argument("--version", action="version", version="%(prog)s 0.1.0")

    args = parser.parse_args()

    if args.data.suffix in (".yaml", ".yml"):
        with open(args.data) as f:
            data = yaml.safe_load(f)
    else:
        sys.exit(f"{args.data.suffix} is not a supported file format.")

    if args.template.suffix != ".j2":
        sys.exit(f"{args.template.suffix} is not a supported template format.")

    with open(args.template) as f:
        template = jinja2.Template(f.read())

    username = data['fabric']['defaults']['credentials']['username']
    password = data['fabric']['defaults']['credentials']['password']

    for switch in data['fabric']['switches'].keys():
        payload = template.render(defaults=data['fabric']['defaults'], switch=data['fabric']['switches'][switch])
        status, auth_cookie = aaa_login(username, password, data['fabric']['switches'][switch]['mgmt'])
        if status == requests.codes.ok:
            url = f"https://{data['fabric']['switches'][switch]['mgmt']}/api/mo/sys.json"
            nxapi_post(url, auth_cookie, payload)
            aaa_logout(username, data['fabric']['switches'][switch]['mgmt'], auth_cookie)
        else:
            print("Error! " + str(status))


if __name__ == '__main__':
    main()
With your Python script defined, it's time to create the Jinja template file that will be used to configure PIM for each switch in your fabric. Once again, the Jinja template will be driven by the data file you defined in the first section. This template introduces you to templating something other than raw cli; in this case JSON. Now, it's very important to state that templating JSON is not the same as templating raw CLI. Each has its own syntax and nuances, so you want to be sure to pay attention to the syntax. Alternatively, you could embed payload data structures like this directly in Python and work with it that way.
While this may seem like a pretty big template, it is actually a pretty simple template that will be used to configure PIM Sparse-Mode on the Ethernet interfaces and configure the RP.
Under the topSystem, top of the MIT, the template is broken down into two sections, the first section is the fmEntity JSON object and the second section is the pimEntity JSON object.
The fmEntity JSON object is used to configure the fmPim JSON object, which is used to enable the PIM feature on a switch.
The pimEntity JSON object is used to configure the pimStaticRP JSON object, which is used to configure the RP address and the pimIf JSON object, which is used to enable PIM Sparse-Mode on the Ethernet interfaces.
Much like in the JSON-RPC section, an if condition is used to determine if PIM is defined in the data file in the defaults section or the switch specific section.
Then a pim variable is set to determine if the switch specific section is defined and if not, the variable is set to None.
Using the pim variable, the template will then render the JSON payload for the pimStaticRP JSON object using the switch specific RP address if defined or the default RP address; pim['rp_address'] | default(defaults['pim']['rp_address']).
Lastly, the pimIf JSON object is rendered for each interface of switch as the for loop in the Python script iterates over the switches as defined in the data file.
touch /home/pod01/workspace/nxapilab/scripts/templates/pim.j2
cat <<EOF >> /home/pod01/workspace/nxapilab/scripts/templates/pim.j2
{
    "topSystem": {
        "children": [
            {%- if defaults['pim'] or switch['pim'] %}
            {%- set pim = switch.get('pim', None) %}
            {
                "fmEntity": {
                    "children": [
                        {
                            "fmPim": {
                                "attributes": {
                                    "adminSt": "enabled"
                                }
                            }
                        }
                    ]
                }
            },
            {
                "pimEntity": {
                    "children": [
                        {
                            "pimInst": {
                                "children": [
                                    {
                                        "pimDom": {
                                            "attributes": {
                                                "name": "default"
                                            },
                                            "children": [
                                                {
                                                    "pimStaticRPP": {
                                                        "children": [
                                                            {
                                                                "pimStaticRP": {
                                                                    "attributes": {
                                                                        "addr": "{{ pim['rp_address'] | default(defaults['pim']['rp_address']) }}"
                                                                    },
                                                                    "children": [
                                                                        {
                                                                            "pimRPGrpList": {
                                                                                "attributes": {
                                                                                    "bidir": "no",
                                                                                    "grpListName": "239.1.1.0/25",
                                                                                    "override": "no"
                                                                                }
                                                                            }
                                                                        }
                                                                    ]
                                                                }
                                                            }
                                                        ]
                                                    }
                                                }{%- for interface in switch['interfaces'] %},
                                                {
                                                    "pimIf": {
                                                        "attributes": {
                                                            "id": "{{ interface['name'][0:3].lower() + interface['name'][8:] }}",
                                                            "pimSparseMode": "yes"
                                                        }
                                                    }
                                                }
                                                {%- endfor %}
                                            ]
                                        }
                                    }
                                ]
                            }
                        }
                    ]
                }
            }
            {%- endif %}
        ]
    }
}
EOF
Return to the VSCode Terminal command line to execute your code:
python nxapi_rest.py --data=data.yaml --template=templates/pim.j2
Printed below is the code execution on the switches in your staging fabric; you can see the REST payload sent to the switch(s) and the response from the switch(s):
Make note of the payload that was generated from the Jinja template.
{"imdata": [{"aaaLogin": {"attributes": {"token": "egeZWHsQuwhtSGNO6yDGr6bKPGiioJj/ovl/+kNQjhTvSvu3LxQhhZDWvpz406yYUR0W+ZgKek4nQwZqChhwZ7ky9BLU67rQzUvRONWppILavOmXpNe5YaAlj69FxBU4twI3pjugEhcbdZ+7GvLIAUfpt+a7B1/PU3jXf4r0Puk=", "siteFingerprint": "", "refreshTimeoutSeconds": "600", "guiIdleTimeoutSeconds": "1200", "restTimeoutSeconds": "300", "creationTime": "1770647877", "firstLoginTime": "1770647877", "userName": "admin", "remoteUser": "false", "unixUserId": "0", "sessionId": "RiNXAXPM2lexPqYD/x/p+w==", "lastName": "", "firstName": "", "version": "10.6(2HEAD${version.patch})", "buildTime": "Fri Dec 12 07:03:40 GMT 2025", "controllerId": "0"}, "children": [{"aaaUserDomain": {"attributes": {"name": "all", "rolesR": "admin", "rolesW": "admin"}, "children": [{"aaaReadRoles": {"attributes": {}}}, {"aaaWriteRoles": {"attributes": {}, "children": [{"role": {"attributes": {"name": "network-admin"}}}]}}]}}]}}]}
{
    "topSystem": {
        "children": [
            {
                "fmEntity": {
                    "children": [
                        {
                            "fmPim": {
                                "attributes": {
                                    "adminSt": "enabled"
                                }
                            }
                        }
                    ]
                }
            },
            {
                "pimEntity": {
                    "children": [
                        {
                            "pimInst": {
                                "children": [
                                    {
                                        "pimDom": {
                                            "attributes": {
                                                "name": "default"
                                            },
                                            "children": [
                                                {
                                                    "pimStaticRPP": {
                                                        "children": [
                                                            {
                                                                "pimStaticRP": {
                                                                    "attributes": {
                                                                        "addr": "10.251.251.1"
                                                                    },
                                                                    "children": [
                                                                        {
                                                                            "pimRPGrpList": {
                                                                                "attributes": {
                                                                                    "bidir": "no",
                                                                                    "grpListName": "239.1.1.0/25",
                                                                                    "override": "no"
                                                                                }
                                                                            }
                                                                        }
                                                                    ]
                                                                }
                                                            }
                                                        ]
                                                    }
                                                },
                                                {
                                                    "pimIf": {
                                                        "attributes": {
                                                            "id": "eth1/1",
                                                            "pimSparseMode": "yes"
                                                        }
                                                    }
                                                },
                                                {
                                                    "pimIf": {
                                                        "attributes": {
                                                            "id": "eth1/2",
                                                            "pimSparseMode": "yes"
                                                        }
                                                    }
                                                },
                                                {
                                                    "pimIf": {
                                                        "attributes": {
                                                            "id": "eth1/3",
                                                            "pimSparseMode": "yes"
                                                        }
                                                    }
                                                }
                                            ]
                                        }
                                    }
                                ]
                            }
                        }
                    ]
                }
            }
        ]
    }
}
{"imdata": []}
{"imdata": []}
{"imdata": [{"aaaLogin": {"attributes": {"token": "yLYmxW3NUpaLP3czUreNjTOB1E0bIqg1Ri6e46xeMZK6ZoUdj5JOvh9I46zT9DfCQXg77jhRoN4Dp+IkfJZC8wiztaB8qZN5uXi6VDpDHkYWcbyeCEiPo7UKF7/c2rFSeTBGcCImGDeGB/fniZl4d27+QG8QZ8sm8nZtPfLouDs=", "siteFingerprint": "", "refreshTimeoutSeconds": "600", "guiIdleTimeoutSeconds": "1200", "restTimeoutSeconds": "300", "creationTime": "1770647877", "firstLoginTime": "1770647877", "userName": "admin", "remoteUser": "false", "unixUserId": "0", "sessionId": "qlLlgDCQ47XfrE05qSeuYg==", "lastName": "", "firstName": "", "version": "10.6(2HEAD${version.patch})", "buildTime": "Fri Dec 12 07:03:40 GMT 2025", "controllerId": "0"}, "children": [{"aaaUserDomain": {"attributes": {"name": "all", "rolesR": "admin", "rolesW": "admin"}, "children": [{"aaaReadRoles": {"attributes": {}}}, {"aaaWriteRoles": {"attributes": {}, "children": [{"role": {"attributes": {"name": "network-admin"}}}]}}]}}]}}]}
{
    "topSystem": {
        "children": [
            {
                "fmEntity": {
                    "children": [
                        {
                            "fmPim": {
                                "attributes": {
                                    "adminSt": "enabled"
                                }
                            }
                        }
                    ]
                }
            },
            {
                "pimEntity": {
                    "children": [
                        {
                            "pimInst": {
                                "children": [
                                    {
                                        "pimDom": {
                                            "attributes": {
                                                "name": "default"
                                            },
                                            "children": [
                                                {
                                                    "pimStaticRPP": {
                                                        "children": [
                                                            {
                                                                "pimStaticRP": {
                                                                    "attributes": {
                                                                        "addr": "10.251.251.1"
                                                                    },
                                                                    "children": [
                                                                        {
                                                                            "pimRPGrpList": {
                                                                                "attributes": {
                                                                                    "bidir": "no",
                                                                                    "grpListName": "239.1.1.0/25",
                                                                                    "override": "no"
                                                                                }
                                                                            }
                                                                        }
                                                                    ]
                                                                }
                                                            }
                                                        ]
                                                    }
                                                },
                                                {
                                                    "pimIf": {
                                                        "attributes": {
                                                            "id": "eth1/1",
                                                            "pimSparseMode": "yes"
                                                        }
                                                    }
                                                },
                                                {
                                                    "pimIf": {
                                                        "attributes": {
                                                            "id": "eth1/2",
                                                            "pimSparseMode": "yes"
                                                        }
                                                    }
                                                },
                                                {
                                                    "pimIf": {
                                                        "attributes": {
                                                            "id": "eth1/3",
                                                            "pimSparseMode": "yes"
                                                        }
                                                    }
                                                }
                                            ]
                                        }
                                    }
                                ]
                            }
                        }
                    ]
                }
            }
        ]
    }
}
{"imdata": []}
{"imdata": []}
{"imdata": [{"aaaLogin": {"attributes": {"token": "ir7BZKKALbwSxrALtW/ibAwWmatqGUh3+XiGLu3z5eHIEvnS99rX4mEnY5jNg2Jaa9sm38/JSyeesSrNrsY4iENbGfV2hQ9W+1QXYYqxQ4YuK2JV3Of9KA4+Gu8JxDOar8xCzVrD5acTCeSkHkCkeHXIZ/YnkouskTMLRz+2F+0=", "siteFingerprint": "", "refreshTimeoutSeconds": "600", "guiIdleTimeoutSeconds": "1200", "restTimeoutSeconds": "300", "creationTime": "1770647876", "firstLoginTime": "1770647876", "userName": "admin", "remoteUser": "false", "unixUserId": "0", "sessionId": "un2hNCe0ksU9Z6J5/rEiEA==", "lastName": "", "firstName": "", "version": "10.6(2HEAD${version.patch})", "buildTime": "Fri Dec 12 07:03:40 GMT 2025", "controllerId": "0"}, "children": [{"aaaUserDomain": {"attributes": {"name": "all", "rolesR": "admin", "rolesW": "admin"}, "children": [{"aaaReadRoles": {"attributes": {}}}, {"aaaWriteRoles": {"attributes": {}, "children": [{"role": {"attributes": {"name": "network-admin"}}}]}}]}}]}}]}
{
    "topSystem": {
        "children": [
            {
                "fmEntity": {
                    "children": [
                        {
                            "fmPim": {
                                "attributes": {
                                    "adminSt": "enabled"
                                }
                            }
                        }
                    ]
                }
            },
            {
                "pimEntity": {
                    "children": [
                        {
                            "pimInst": {
                                "children": [
                                    {
                                        "pimDom": {
                                            "attributes": {
                                                "name": "default"
                                            },
                                            "children": [
                                                {
                                                    "pimStaticRPP": {
                                                        "children": [
                                                            {
                                                                "pimStaticRP": {
                                                                    "attributes": {
                                                                        "addr": "10.251.251.1"
                                                                    },
                                                                    "children": [
                                                                        {
                                                                            "pimRPGrpList": {
                                                                                "attributes": {
                                                                                    "bidir": "no",
                                                                                    "grpListName": "239.1.1.0/25",
                                                                                    "override": "no"
                                                                                }
                                                                            }
                                                                        }
                                                                    ]
                                                                }
                                                            }
                                                        ]
                                                    }
                                                },
                                                {
                                                    "pimIf": {
                                                        "attributes": {
                                                            "id": "eth1/1",
                                                            "pimSparseMode": "yes"
                                                        }
                                                    }
                                                },
                                                {
                                                    "pimIf": {
                                                        "attributes": {
                                                            "id": "eth1/2",
                                                            "pimSparseMode": "yes"
                                                        }
                                                    }
                                                }
                                            ]
                                        }
                                    }
                                ]
                            }
                        }
                    ]
                }
            }
        ]
    }
}
{"imdata": []}
{"imdata": []}
{"imdata": [{"aaaLogin": {"attributes": {"token": "vguWJzkCjTVC17VUZBHw5r3bRryDSA4eiZ4DPWN3mf5KqbzF8uhgR3/NJux3UAKgeKFHfVt3S5QnDdLjI5RXELbZkyPP3nWJ/1/mcSYtmdJu+rTnzVSqn7muzkLoTsTvn2neBBECs+fRSaZ+rCeArK4rquD3c7fZwZ1eAFoZ9fs=", "siteFingerprint": "", "refreshTimeoutSeconds": "600", "guiIdleTimeoutSeconds": "1200", "restTimeoutSeconds": "300", "creationTime": "1770647878", "firstLoginTime": "1770647878", "userName": "admin", "remoteUser": "false", "unixUserId": "0", "sessionId": "5XGImhYilozjaJbKm5dShw==", "lastName": "", "firstName": "", "version": "10.6(2HEAD${version.patch})", "buildTime": "Fri Dec 12 07:03:40 GMT 2025", "controllerId": "0"}, "children": [{"aaaUserDomain": {"attributes": {"name": "all", "rolesR": "admin", "rolesW": "admin"}, "children": [{"aaaReadRoles": {"attributes": {}}}, {"aaaWriteRoles": {"attributes": {}, "children": [{"role": {"attributes": {"name": "network-admin"}}}]}}]}}]}}]}
{
    "topSystem": {
        "children": [
            {
                "fmEntity": {
                    "children": [
                        {
                            "fmPim": {
                                "attributes": {
                                    "adminSt": "enabled"
                                }
                            }
                        }
                    ]
                }
            },
            {
                "pimEntity": {
                    "children": [
                        {
                            "pimInst": {
                                "children": [
                                    {
                                        "pimDom": {
                                            "attributes": {
                                                "name": "default"
                                            },
                                            "children": [
                                                {
                                                    "pimStaticRPP": {
                                                        "children": [
                                                            {
                                                                "pimStaticRP": {
                                                                    "attributes": {
                                                                        "addr": "10.251.251.1"
                                                                    },
                                                                    "children": [
                                                                        {
                                                                            "pimRPGrpList": {
                                                                                "attributes": {
                                                                                    "bidir": "no",
                                                                                    "grpListName": "239.1.1.0/25",
                                                                                    "override": "no"
                                                                                }
                                                                            }
                                                                        }
                                                                    ]
                                                                }
                                                            }
                                                        ]
                                                    }
                                                },
                                                {
                                                    "pimIf": {
                                                        "attributes": {
                                                            "id": "eth1/1",
                                                            "pimSparseMode": "yes"
                                                        }
                                                    }
                                                },
                                                {
                                                    "pimIf": {
                                                        "attributes": {
                                                            "id": "eth1/2",
                                                            "pimSparseMode": "yes"
                                                        }
                                                    }
                                                }
                                            ]
                                        }
                                    }
                                ]
                            }
                        }
                    ]
                }
            }
        ]
    }
}
{"imdata": []}
{"imdata": []}
{"imdata": [{"aaaLogin": {"attributes": {"token": "V2V0eKP4YLwUOTFStZJDCUi7zBUnYYZg1OclAx+Q3TKyhTzdKHLQEIETaowfTHc0xOu+WjZSNXAKpdQxV1a9BEnwIfToi2nhXb7KRSLRpchel6PyFn2ETOTx3hYATT9vrvAQLHuwGMvDt9yUTJWCKrBtM8AvR0tZja+qsbozvNA=", "siteFingerprint": "", "refreshTimeoutSeconds": "600", "guiIdleTimeoutSeconds": "1200", "restTimeoutSeconds": "300", "creationTime": "1770647877", "firstLoginTime": "1770647877", "userName": "admin", "remoteUser": "false", "unixUserId": "0", "sessionId": "PFdaaTqEh1gq9j+OalrUEg==", "lastName": "", "firstName": "", "version": "10.6(2HEAD${version.patch})", "buildTime": "Fri Dec 12 07:03:40 GMT 2025", "controllerId": "0"}, "children": [{"aaaUserDomain": {"attributes": {"name": "all", "rolesR": "admin", "rolesW": "admin"}, "children": [{"aaaReadRoles": {"attributes": {}}}, {"aaaWriteRoles": {"attributes": {}, "children": [{"role": {"attributes": {"name": "network-admin"}}}]}}]}}]}}]}
{
    "topSystem": {
        "children": [
            {
                "fmEntity": {
                    "children": [
                        {
                            "fmPim": {
                                "attributes": {
                                    "adminSt": "enabled"
                                }
                            }
                        }
                    ]
                }
            },
            {
                "pimEntity": {
                    "children": [
                        {
                            "pimInst": {
                                "children": [
                                    {
                                        "pimDom": {
                                            "attributes": {
                                                "name": "default"
                                            },
                                            "children": [
                                                {
                                                    "pimStaticRPP": {
                                                        "children": [
                                                            {
                                                                "pimStaticRP": {
                                                                    "attributes": {
                                                                        "addr": "10.251.251.1"
                                                                    },
                                                                    "children": [
                                                                        {
                                                                            "pimRPGrpList": {
                                                                                "attributes": {
                                                                                    "bidir": "no",
                                                                                    "grpListName": "239.1.1.0/25",
                                                                                    "override": "no"
                                                                                }
                                                                            }
                                                                        }
                                                                    ]
                                                                }
                                                            }
                                                        ]
                                                    }
                                                },
                                                {
                                                    "pimIf": {
                                                        "attributes": {
                                                            "id": "eth1/1",
                                                            "pimSparseMode": "yes"
                                                        }
                                                    }
                                                },
                                                {
                                                    "pimIf": {
                                                        "attributes": {
                                                            "id": "eth1/2",
                                                            "pimSparseMode": "yes"
                                                        }
                                                    }
                                                }
                                            ]
                                        }
                                    }
                                ]
                            }
                        }
                    ]
                }
            }
        ]
    }
}
{"imdata": []}
{"imdata": []}
Navigate back to your VSCode application.
Continue to the next section to get started using Ansible for NXOS.