For the next several sections of this lab, you will be working within VSCode. As previously seen, VSCode offers Terminal support. The Terminal will be used extensively to create and/or open various Python and YAML files within VSCode. While creating and running these various files, you will all the while be building out your VXLAN EVPN staging fabric from the ground up. This first section will set up the data file needed to drive your Python scripts and install the necessary Python packages to support your code. The subsequent sections will leverage NXAPI CLI JSON to configure interfaces, NXAPI CLI JSON-RPC to configure OSPF, and NXAPI REST to configure PIM in your staging fabric.
In your VSCode Terminal, let's ensure we're in the correct directory then create a scripts directory to help keep our code organized:
cd /home/pod01/workspace/nxapilab
mkdir -p scripts/templates
cd scripts
In your VSCode, create a new file called data.yaml in your scripts directory. This data file will be used to store variables that will be used in your Python scripts.
VSCode offers some builtin benefits from its Terminal command line. The keyword code-server is reserved by VSCode Code-Server terminal to take certain actions. Use it to open a new file for your data file:
touch /home/pod01/workspace/nxapilab/scripts/data.yaml
code-server -r /home/pod01/workspace/nxapilab/scripts/data.yaml
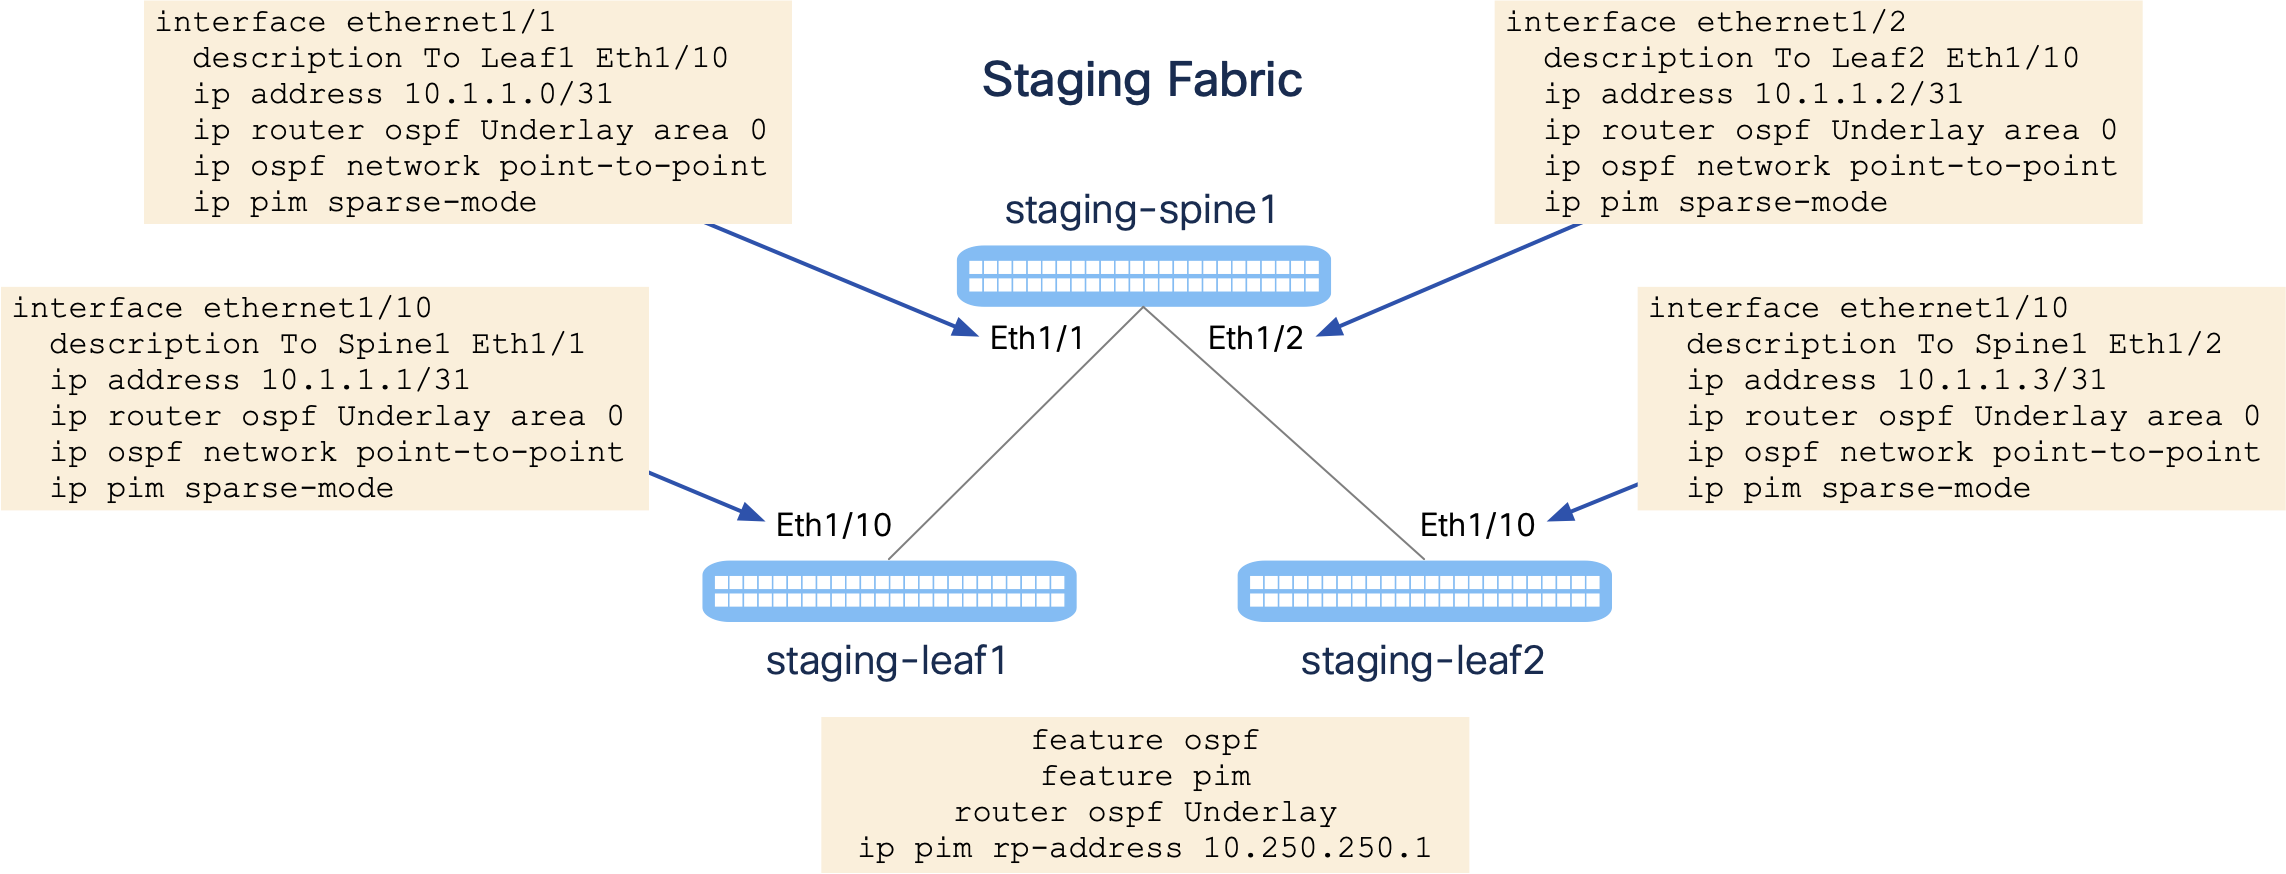
Either copy or type the data below into your data YAML file. The contents of this data include information pertaining to each of your switches in your staging fabric. This information includes connection, interface IP address, OSPF, and PIM information.
---
fabric:
  defaults:
    credentials:
      username: admin
      password: cisco.123
    ospf:
      process: UNDERLAY
      area: 0.0.0.0
      network_type: point-to-point
    pim:
      rp_address: 10.251.251.1
  switches:
    staging-spine1:
      mgmt: 10.15.1.11
      interfaces:
        - name: Ethernet1/1
          description: To Leaf1 E1/1
          port_type: routed
          ip_address: 10.1.1.0
          mask: 31
        - name: Ethernet1/2
          description: To Leaf2 E1/1
          port_type: routed
          ip_address: 10.1.1.2
          mask: 31
        - name: Ethernet1/3
          description: To Border1 E1/1
          port_type: routed
          ip_address: 10.1.1.4
          mask: 31
      router_id: 10.0.0.1
    staging-spine2:
      mgmt: 10.15.1.12
      interfaces:
        - name: Ethernet1/1
          description: To Leaf1 E1/2
          port_type: routed
          ip_address: 10.2.2.0
          mask: 31
        - name: Ethernet1/2
          description: To Leaf2 E1/2
          port_type: routed
          ip_address: 10.2.2.2
          mask: 31
        - name: Ethernet1/3
          description: To Border1 E1/2
          port_type: routed
          ip_address: 10.2.2.4
          mask: 31
      router_id: 10.0.0.2
    staging-leaf1:
      mgmt: 10.15.1.21
      interfaces:
        - name: Ethernet1/1
          description: To Spine1 E1/1
          port_type: routed
          ip_address: 10.1.1.1
          mask: 31
        - name: Ethernet1/2
          description: To Spine2 E1/1
          port_type: routed
          ip_address: 10.2.2.1
          mask: 31
      router_id: 10.0.0.101
    staging-leaf2:
      mgmt: 10.15.1.22
      interfaces:
        - name: Ethernet1/1
          description: To Spine1 E1/2
          port_type: routed
          ip_address: 10.1.1.3
          mask: 31
        - name: Ethernet1/2
          description: To Spine2 E1/2
          port_type: routed
          ip_address: 10.2.2.3
          mask: 31
      router_id: 10.0.0.102
    staging-leaf3:
      mgmt: 10.15.1.23
      interfaces:
        - name: Ethernet1/1
          description: To Spine1 E1/3
          port_type: routed
          ip_address: 10.1.1.5
          mask: 31
        - name: Ethernet1/2
          description: To Spine2 E1/3
          port_type: routed
          ip_address: 10.2.2.5
          mask: 31
      router_id: 10.0.0.103
To use the data YAML file you created above, you need to install a new Python package via pip. Return to your VSCode Terminal and install the PyYAML library for use in this lab. You will also install the Jinja2 library which will be used in the next section of this lab to start templating the fabric network configuration. Do this by either typing or copying the command below into your VSCode Terminal window:
pip install pyyaml==6.0.3 jinja2==3.1.6
Verify the PyYAML and Jinja2 packages are installed in your virtualenv.
pip freeze
pip freeze output:
    certifi==2026.1.4
    charset-normalizer==3.4.4
    idna==3.11
    Jinja2==3.1.6
    MarkupSafe==3.0.3
    PyYAML==6.0.3
    requests==2.32.5
    urllib3==2.6.3
Jinja is a powerful, full-featured and customizable templating engine. It incorporates special placeholders in the template that enable the inclusion of code resembling Python syntax. A Jinja2 template is essentially a normal text file with special placeholders which upon receiving some data values or variables will be used to render the final document.
Its expressive syntax, and flexibility make it a popular choice for developers of all skill levels. Developed as part of the Flask web framework, Jinja2 allows developers to embed dynamic content seamlessly within HTML, XML, or other markup languages. With its intuitive syntax, Jinja2 enables the inclusion of variables, control structures, and templates, making it easy to create dynamic and flexible content.
Jinja2 supports features like template inheritance, macros, and filters, providing a powerful and efficient way to manage and organize templates in Python applications. Some of the built-in features Jinja2 supports
include setting variables using the set assignment and leverage setting default values using the default() filter if a variable has not been set already. You will see both of these features used throughout this lab.
A quick example is shown below. Just for Reference, no need to copy/paste anywhere.
Hello Pod{{ data.pod_id }} user!
Hope you are enjoying the {{ data.lab_id }} lab so far!
Hello Pod1 user!
We hope you are enjoying the LTRDCN-3903 Lab so far!
---
data:
  pod_id: 1
  lab_id: LTRDCN-3903
Continue to the next section on using NX-API CLI Cisco JSON interface with Python to configure interfaces on your staging fabric switches.