As previously mentioned, Cisco has the largest number of supported network modules, particularly for NXOS. In this
lab module, you'll examine and make use of these Ansible
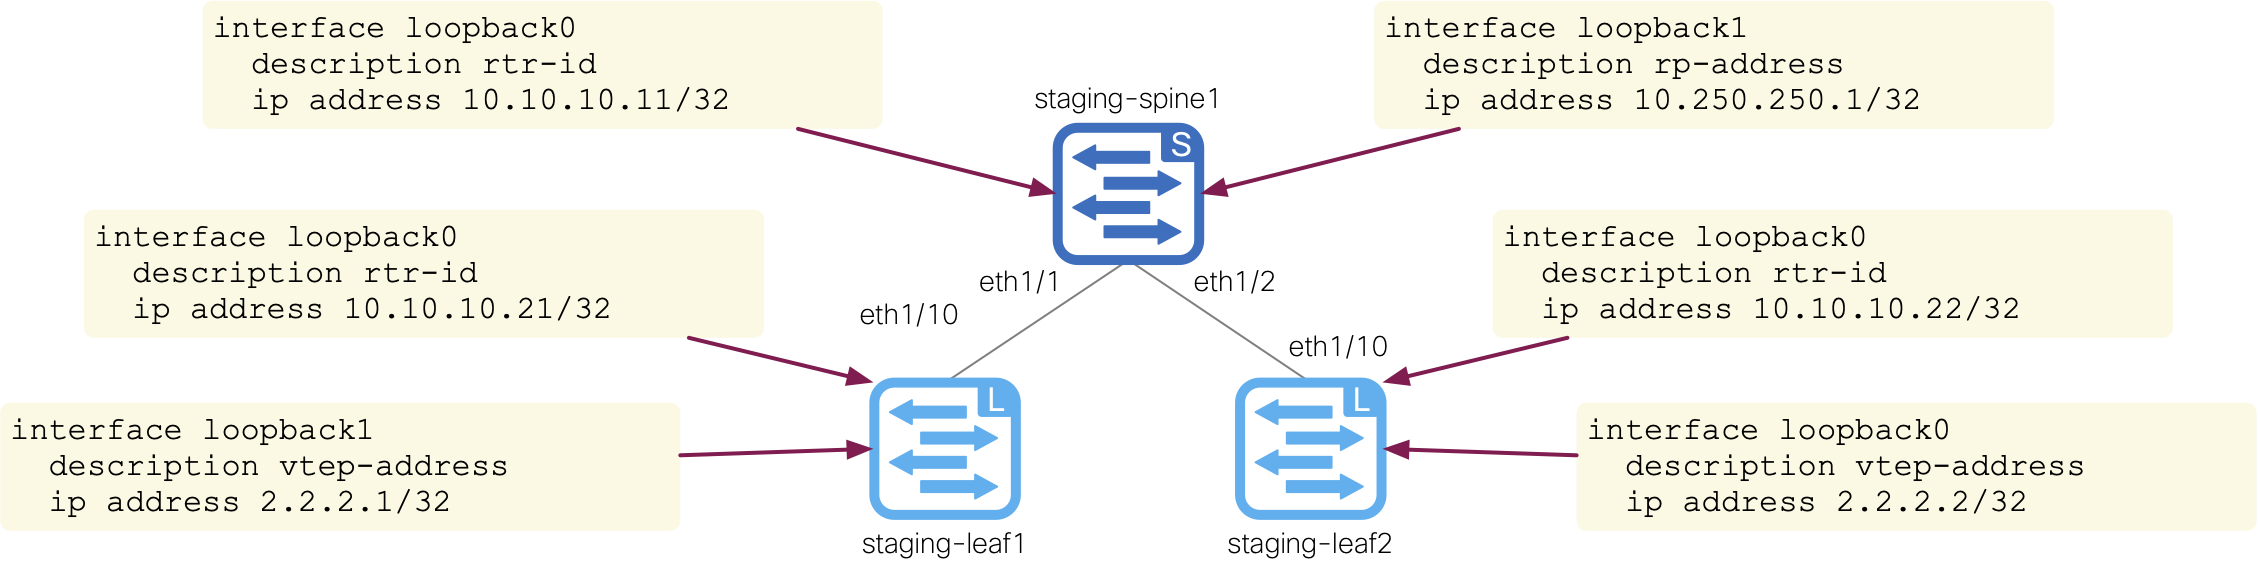
NXOS Modules and Repo
modules for common, underlay, and overlay role tasks. The Ansible documentation for each network module
provides a synopsis of what function the module performs and a
table of parameters or keys. The tabulated parameters inform the user which parameters are required for the module
to function as a task, which parameters are optional, and what the defaults are for the parameters. There are many
network modules that exist to configure VLANs, Interfaces, BGP, OSPF, PIM, VXLAN, etc. If a module does not exist,
one particular module, called nxos_config, can be used to issue commands that do not have an existing module.
The tasks for the common role will be completed first. You can find a list of the NXOS network modules you'll be using below on the left and the equivalent of what the CLI configuration commands would be on the right:
cisco.nxos.nxos_featurecisco.nxos.nxos_hostnamecisco.nxos.nxos_ntp_global
          feature bgp
          feature nv overlay
          !
          hostname staging-spine1
          !
          ntp server 10.81.254.131
For all the tasks below, return to your VSCode Terminal to open and build-out the main.yml file found in roles/common/tasks/ using the VSCode code keyword as before.
code-server -r /home/pod06/workspace/nxapilab/ansible-nxos/roles/common/tasks/main.yml
Copy the below YAML that is your common role into roles/common/tasks/main.yml file that is opened in VSCode.
These tasks use the variables you defined in your group_vars and host_vars.
The last task, cisco.nxos.nxos_feature, introduces another new concept in Ansible, loops.
The loop parameter is used for looping through lists.
Using loop, you can iterate over the lists and reference the keys (subkeys) by using item.subkey that specifies the value at that subkey location.
Throughout the build-out of tasks in various main.yml files, you will use loop frequently to save on
typing and to repeat tasks.
- name: Configure Hostname
  cisco.nxos.nxos_hostname:
    config:
      hostname: "{{ hostname }}"
    state: merged

- name: Configure NTP Server
  cisco.nxos.nxos_ntp_global:
    config:
      servers:
        - server: "{{ ntp_server }}"
          use_vrf: management
          prefer: true
    state: merged

- name: Enable Features
  cisco.nxos.nxos_feature:
    feature: "{{ item }}"
    state: enabled
  loop: "{{ features }}"
The tasks for the underlay role will now be completed. You can find a list of the NXOS network modules you'll be using below on the left and the equivalent of what the CLI configuration commands would be on the right:
cisco.nxos.nxos_interfacescisco.nxos.nxos_l3_interfacescisco.nxos.nxos_ospfv2cisco.nxos.nxos_ospf_interfacescisco.nxos.nxos_pim_rp_addresscisco.nxos.nxos_pim_interfacecisco.nxos.nxos_evpn_globalcisco.nxos.nxos_bgp_globalcisco.nxos.nxos_bgp_neighbor_address_familycisco.nxos.nxos_config
        nv overlay evpn
        interface loopback0
            ip address 10.10.10.21/32
            ip pim sparse-mode
            ip router ospf UNDERLAY area 0
        interface loopback1
            ip address 2.2.2.1/32
            ip pim sparse-mode
            ip router ospf UNDERLAY area 0
        router bgp 65001
            router-id 10.10.10.21
            neighbor 10.10.10.11
            remote-as 65001
            update-source loopback0
            address-family l2vpn evpn
                send-community
                send-community extended
            vrf Tenant-1
            address-family ipv4 unicast
                advertise l2vpn evpn
For all the tasks below, you will continue using VSCode to open and build-out the main.yml file found in roles/underlay/tasks/.
code-server -r /home/pod06/workspace/nxapilab/ansible-nxos/roles/underlay/tasks/main.yml
Copy the below tasks into the roles/underlay/tasks/main.yml file that is opened in VSCode.
Using the NXOS interface modules, the first set of tasks will configure the Layer 3 interfaces and IP addresses.
- name: Configure L3 Interface(s)
  cisco.nxos.nxos_interfaces:
    config:
      - name: "{{ item['interface'] }}"
        description: "{{ item['description'] }}"
        mode: "{{ 'layer3' if 'Ethernet' in item['interface'] else omit }}"
        mtu: "{{ item['mtu'] if 'Ethernet' in item['interface'] else omit }}"
        enabled: true
    state: merged
  loop: "{{ all_layer3_interfaces | flatten(1) }}"

- name: Configure IP Address on L3 Interfaces
  cisco.nxos.nxos_l3_interfaces:
    config:
      - name: "{{ item.interface }}"
        ipv4:
          - address: "{{ item.ip_address }}/{{ item.mask }}"
    state: merged
  loop: "{{ all_layer3_interfaces | flatten(1) }}"
Using the NXOS OSPF modules, these set of tasks will configure the OSPF process and OSPF interfaces.
- name: Configure Underlay OSPF Process
  cisco.nxos.nxos_ospfv2:
    config:
      processes:
        - process_id: "{{ ospf.process_id }}"
          router_id: "{{ loopback_interfaces[0].ip_address }}"
    state: merged

- name: Configure Interface Association to OSPF Process
  cisco.nxos.nxos_ospf_interfaces:
    config:
      - name: "{{ item.interface }}"
        address_family:
          - afi: ipv4
            network: point-to-point
            processes:
              - process_id: "{{ ospf.process_id }}"
                area:
                  area_id: "{{ ospf.area_id }}"
    state: merged
  loop: "{{ all_layer3_interfaces | flatten(1) }}"
Using the NXOS OSPF modules, these set of tasks will configure PIM RP address and PIM interfaces.
Note, in the first task below, the cisco.nxos.nxos_config, is used to issue the PIM Anycast RP commands that do not have an existing module.
In this lab, you only have one spine switch, so the second PIM Anycast RP command is commented out.
Also note, the loopback addresses are used from the host_vars for the spine switches and dynamically looked up using the reserved Ansible hostvars and groups variables.
- name: Configure PIM Anycast RP
  cisco.nxos.nxos_config:
    lines:
      - "ip pim anycast-rp \
          {{ hostvars[groups['spines'][0]].loopback_interfaces[1].ip_address }} \
          {{ hostvars[groups['spines'][0]].loopback_interfaces[0].ip_address }}"
      # - "ip pim anycast-rp \
      #     {{ hostvars[groups['spines'][1]].loopback_interfaces[1].ip_address }} \
      #     {{ hostvars[groups['spines'][1]].loopback_interfaces[0].ip_address }}"
  when: inventory_hostname in groups['spines']

- name: Configure Interface Association to PIM Process
  cisco.nxos.nxos_pim_interface:
    interface: "{{ item.interface }}"
    sparse: true
    state: present
  loop: "{{ all_layer3_interfaces | flatten(1) }}"

- name: Configure PIM RP Address
  cisco.nxos.nxos_pim_rp_address:
    rp_address: "{{ hostvars[groups['spines'][0]].loopback_interfaces[1].ip_address }}"
    state: present
Using the NXOS BGP modules, these set of tasks will configure the BGP process and BGP neighbors.
- name: Enable NV Overlay EVPN
  cisco.nxos.nxos_evpn_global:
    nv_overlay_evpn: true

- name: Configure BGP Process and Neighbors
  cisco.nxos.nxos_bgp_global:
    config:
      as_number: "{{ bgp.asn }}"
      router_id: "{{ loopback_interfaces[0].ip_address }}"
      neighbors:
        - neighbor_address: "{{ item.neighbor }}"
          remote_as: "{{ item.remote_as }}"
          update_source: "{{ item.update_source }}"
    state: merged
  loop: "{{ bgp.neighbors }}"

- name: Configure BGP Neighbor Address-Families
  cisco.nxos.nxos_bgp_neighbor_address_family:
    config:
      as_number: "{{ bgp.asn }}"
      neighbors:
        - neighbor_address: "{{ item.neighbor }}"
          address_family:
            - afi: l2vpn
              safi: evpn
              route_reflector_client: "{{ 'yes' if inventory_hostname in groups['spines'] else omit }}"
              send_community:
                both: true
    state: merged
  loop: "{{ bgp.neighbors }}"
The tasks for the overlay role will now be completed. You can find a list of the NXOS network modules you'll be using below on the left and the equivalent of what the CLI configuration commands would be on the right:
cisco.nxos.nxos_vlanscisco.nxos.nxos_vrfcisco.nxos.nxos_vrf_afcisco.nxos.nxos_vrf_interfacecisco.nxos.nxos_vxlan_vtepcisco.nxos.nxos_vxlan_vtep_vnicisco.nxos.nxos_evpn_vnicisco.nxos.nxos_overlay_globalcisco.nxos.nxos_config
        nv overlay evpn
        vlan 10
            vn-segment 10000
        vlan 11
            vn-segment 10011
        interface loopback0
            ip address 10.10.10.21/32
            ip pim sparse-mode
            ip router ospf UNDERLAY area 0
        interface loopback1
            ip address 2.2.2.1/32
            ip pim sparse-mode
            ip router ospf UNDERLAY area 0
        vrf context Tenant-1
            vni 10000
            rd auto
            address-family ipv4 unicast
            route-target both auto evpn
        router bgp 65001
            vrf Tenant-1
              address-family ipv4 unicast
                advertise l2vpn evpn
        evpn
            vni 10011 l2
            rd auto
            route-target import auto
            route-target export auto
        interface Vlan10
            no shutdown
            vrf member Tenant-1
            ip forward
        interface Vlan11
            no shutdown
            vrf member Tenant-1
            ip address 10.0.11.1/24
            fabric forwarding mode anycast-gateway
        interface nve1
            no shutdown
            source-interface loopback1
            host-reachability protocol bgp
            member vni 10000 associate-vrf
            member vni 10011
            mcast-group 239.0.0.11
For all the tasks below, you will continue using VSCode to open and build-out the main.yml file found in roles/overlay/tasks/.
code-server -r /home/pod06/workspace/nxapilab/ansible-nxos/roles/overlay/tasks/main.yml
Copy the below tasks into the roles/overlay/tasks/main.yml file that is opened in VSCode.
Using the NXOS VLAN module, the first set of tasks will use your leafs group_vars to create the VLAN to VNI mapping.
- name: Configure VLAN-to-VNI Mappings
  cisco.nxos.nxos_vlans:
    config:
      - name: "{{ item.vlan_name }}"
        vlan_id: "{{ item.vlan_id }}"
        mapped_vni: "{{ item.vni_id }}"
    state: merged
  loop: "{{ vrfs + networks }}"
Using the NXOS VRF modules, these sec of tasks will use your leafs group_vars to create the L3VNI VRF context and under the BGP process.
- name: Configure L3VNI VRF(s)
  cisco.nxos.nxos_vrf:
    vrf: "{{ item.vrf_name }}"
    vni: "{{ item.vni_id }}"
    rd: auto
    state: present
  loop: "{{ vrfs }}"

- name: Configure L3VNI VRF(s) Address-Family
  cisco.nxos.nxos_vrf_af:
    vrf: "{{ item.vrf_name }}"
    afi: ipv4
    route_targets:
      - rt: auto
        direction: both
        state: present
    route_target_both_auto_evpn: true
    state: present
  loop: "{{ vrfs }}"

- name: Configure BGP L3VNI VRFs
  cisco.nxos.nxos_bgp_address_family:
    config:
      as_number: "{{ bgp.asn }}"
      address_family:
        - vrf: "{{ item.vrf_name }}"
          afi: ipv4
          safi: unicast
          advertise_l2vpn_evpn: true
    state: merged
  loop: "{{ vrfs }}"
Using the NXOS interface and VXLAN modules, these sec of tasks will use your leafs group_vars to create the VXLAN configuration on your leaf switches.
- name: Configure Anycast Gateway MAC Address
  cisco.nxos.nxos_overlay_global:
    anycast_gateway_mac: "1234.5678.9000"

- name: Create & Enable VXLAN VTEP NVE Interface
  cisco.nxos.nxos_interfaces:
    config:
      - name: nve1
        enabled: true
    state: merged

- name: Configure VXLAN VTEP NVE Interface
  cisco.nxos.nxos_vxlan_vtep:
    interface: nve1
    host_reachability: true
    source_interface: Loopback1
    shutdown: false
    state: present

- name: Configure VXLAN VTEP NVE Interface L3VNI Mapping(s)
  cisco.nxos.nxos_vxlan_vtep_vni:
    interface: nve1
    vni: "{{ item.vni_id }}"
    assoc_vrf: true
    state: present
  loop: "{{ vrfs }}"

- name: Configure VXLAN VTEP NVE Interface L2VNI Mapping(s)
  cisco.nxos.nxos_vxlan_vtep_vni:
    interface: nve1
    vni: "{{ item.vni_id }}"
    multicast_group: "{{ item.mcast_grp }}"
    state: present
  loop: "{{ networks }}"

- name: Configure L2VNI Under EVPN
  cisco.nxos.nxos_evpn_vni:
    vni: "{{ item.vni_id }}"
    route_distinguisher: auto
    route_target_both: auto
    state: present
  loop: "{{ networks }}"
Using the NXOS interface modules, these sec of tasks will use your leafs group_vars to create the VXLAN Anycast gateway configuration on your leaf switches.
Note, the usage of loop is used to combine your leaf group_var vrfs and networks into a single list to loop through by simply using the plus (+) operator.
- name: Configure L3VNI & L2VNI Anycast SVI(s)
  cisco.nxos.nxos_interfaces:
    config:
      - name: vlan{{ item.vlan_id }}
        enabled: true
    state: merged
  loop: "{{ vrfs + networks }}"

- name: Configure Anycast SVI(s) VRF Association
  cisco.nxos.nxos_vrf_interface:
    interface: "vlan{{ item.vlan_id }}"
    vrf: "{{ item.vrf_name }}"
    state: present
  loop: "{{ vrfs + networks }}"

- name: Enable Anycast GW SVI(s)
  cisco.nxos.nxos_interfaces:
    config:
      - name: "vlan{{ item.vlan_id }}"
        ip_forward: "{{ 'true' if item.addr is not defined else omit }}"
        fabric_forwarding_anycast_gateway: "{{ 'true' if item.addr is defined else omit }}"
        enabled: true
    state: merged
  loop: "{{ vrfs + networks }}"

- name: Configure L2VNI Anycast Host-Facing SVI(s) IP Address
  cisco.nxos.nxos_l3_interfaces:
    config:
      - name: "vlan{{ item.vlan_id }}"
        ipv4:
          - address: "{{ item.addr }}/{{ item.mask }}"
    state: merged
  loop: "{{ networks }}"
Continue on to the next section for the final pieces needed to execute your Ansible playbook to finish configuring the VXLAN EVPN fabric.