If you choose not to leverage the XML or JSON request interface structure, you can make use of JSON-RPC 2.0 for NX-API CLI. Cisco adheres to the JSON-RPC 2.0 specification found at jsonrpc.org. The JSON-RPC version must be version 2.0. As you did in the previous module, you will make use of the same show command and configuration command to examine the JSON-RPC 2.0 data structure for requests and responses.
JSON-RPC is a remote procedure call (RPC) protocol that uses the JSON data structure. The syntax and data structure look very similar to that of the JSON interface. The request elements differ as they adhere to the JSON-RPC 2.0 specification.
| Request Element | Description |
|---|---|
| jsonrpc | JSON-RPC version. Must be version 2.0 |
| method |
String containing method to be invoked
|
| params |
Structured value that holds the parameter values to be used during the invocation of the above methods
|
| id | An optional identifier established by the Client that MUST contain a String, Number, or NULL value if it is specified. The value SHOULD normally not be Null and Numbers SHOULD NOT contain fractional parts. If the user does not specify the id parameter, then the server assumes the request is simply a notification and no response will be given. |
| rollback |
Specifies the rollback options. Only valid for configuration commands, not show commands.
|
| Response Element | Description |
|---|---|
| jsonrpc | JSON-RPC version. Must be version 2.0 |
| result |
This field is ONLY included on success The value of this field contains the requested CLI output |
| error |
This field is ONLY included on error (mutually exclusive with result object) The error object contains the following fields:
|
| id | An optional identifier established by the Client that MUST contain a String, Number, or NULL value if it is specified. The value SHOULD normally not be Null and Numbers SHOULD NOT contain fractional parts. If the user does not specify the id parameter, then the server assumes the request is simply a notification and no response will be given. |
[
  {
    "jsonrpc": "2.0",
    "method": "cli",
    "params": {
      "cmd": "router ospf UNDERLAY",
      "version": 1
    },
    "id": 1
  }
]
In the NX-API Sandbox web application:
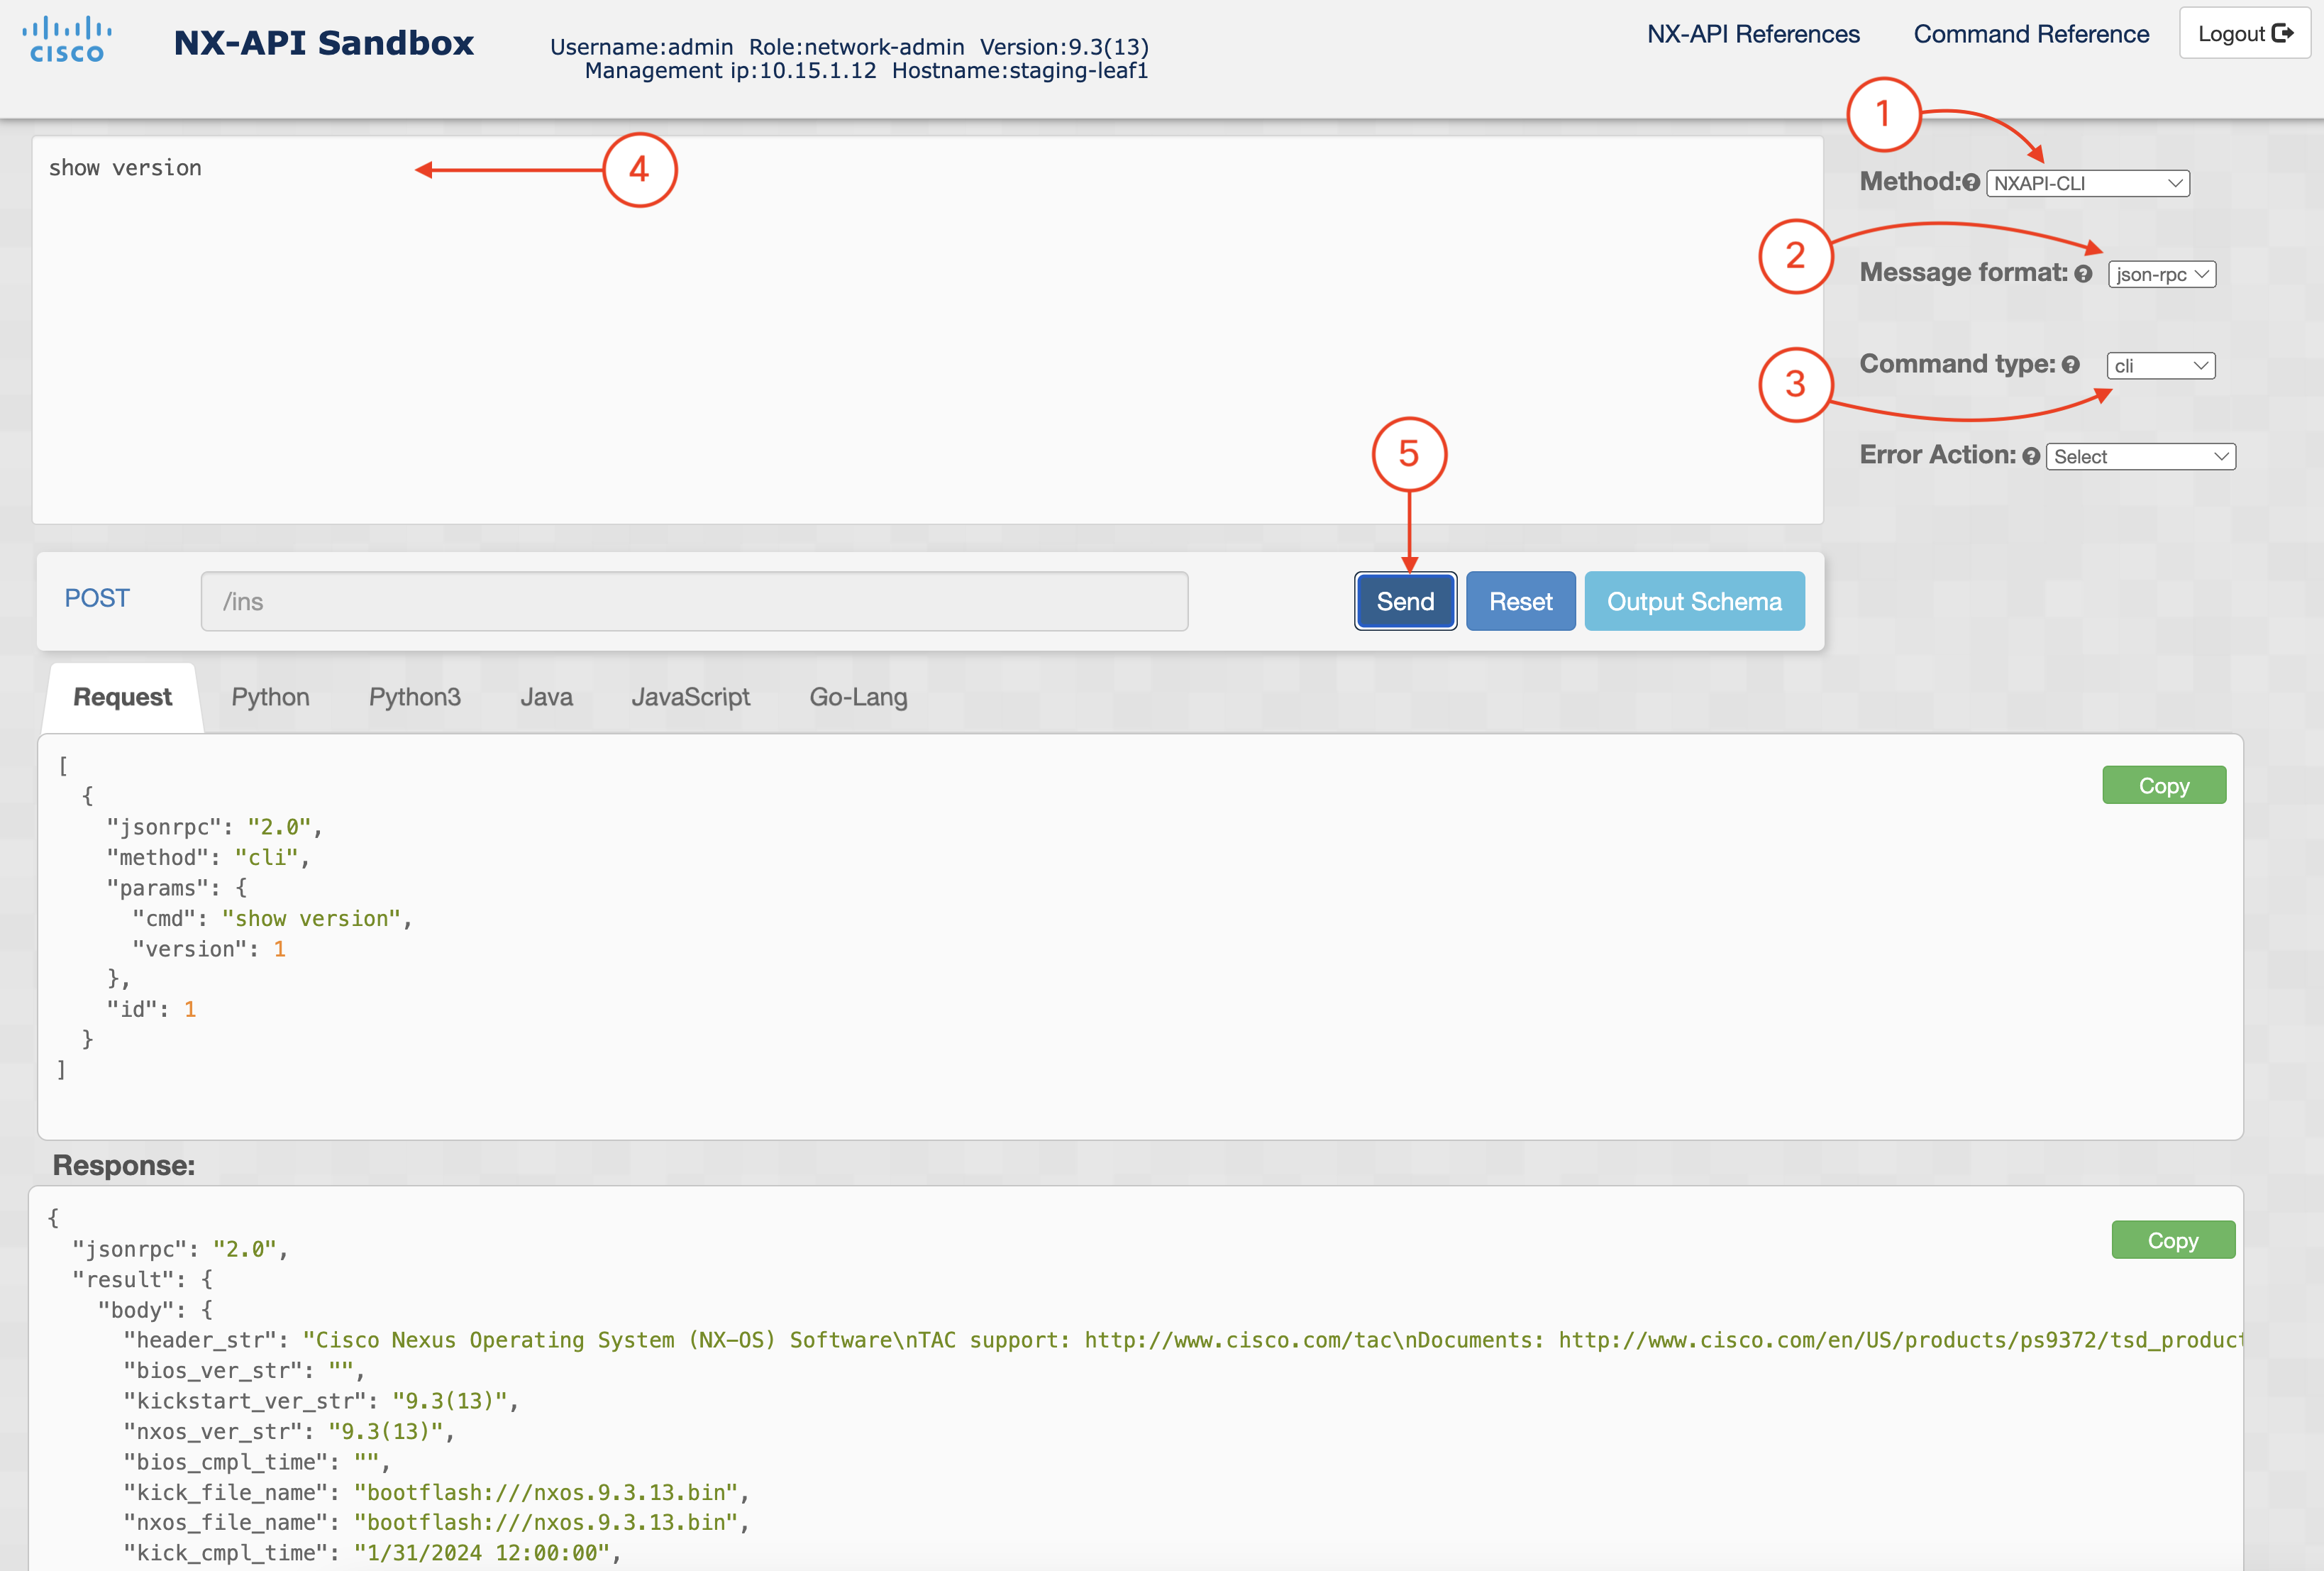
Locate these two panes: Request: and Response: Within each, you will notice the request and response elements and values. The response provides you a data structure of key/pair values that can be easily parsed. This is similar to the examples in the previous module.
Request:
[
  {
    "jsonrpc": "2.0",
    "method": "cli",
    "params": {
      "cmd": "show version",
      "version": 1
    },
    "id": 1
  }
]
Response:
{
  "jsonrpc": "2.0",
  "result": {
    "body": {
      "header_str": "Cisco Nexus Operating System (NX-OS) Software\nTAC support: http://www.cisco.com/tac\nDocuments: http://www.cisco.com/en/US/products/ps9372/tsd_products_support_series_home.html\nCopyright (c) 2002-2024, Cisco Systems, Inc. All rights reserved.\nThe copyrights to certain works contained herein are owned by\nother third parties and are used and distributed under license.\nSome parts of this software are covered under the GNU Public\nLicense. A copy of the license is available at\nhttp://www.gnu.org/licenses/gpl.html.\n\nNexus 9000v is a demo version of the Nexus Operating System\n",
      "bios_ver_str": "",
      "kickstart_ver_str": "10.5(2)",
      "release_type": "Feature Release",
      "nxos_ver_str": "10.5(2)",
      "bios_cmpl_time": "",
      "kick_file_name": "bootflash:///nxos64-cs-lite.10.5.2.F.bin",
      "nxos_file_name": "bootflash:///nxos64-cs-lite.10.5.2.F.bin",
      "kick_cmpl_time": "11/30/2024 12:00:00",
      "nxos_cmpl_time": "11/30/2024 12:00:00",
      "kick_tmstmp": "11/26/2024 10:34:40",
      "nxos_tmstmp": "11/26/2024 10:34:40",
      "chassis_id": "cisco Nexus9000 C9300v Chassis",
      "cpu_name": "Intel(R) Xeon(R) CPU E5-2680 v3 @ 2.50GHz",
      "memory": 8145828,
      "mem_type": "kB",
      "proc_board_id": "9EP3POD8HOP",
      "host_name": "N9Kv-L1",
      "bootflash_size": 8598528,
      "kern_uptm_days": 0,
      "kern_uptm_hrs": 10,
      "kern_uptm_mins": 45,
      "kern_uptm_secs": 27,
      "rr_reason": "Unknown",
      "rr_sys_ver": "",
      "rr_service": "",
      "plugins": "Core Plugin, Ethernet Plugin",
      "manufacturer": "Cisco Systems, Inc.",
      "TABLE_package_list": {
        "ROW_package_list": {
          "package_id": ""
        }
      }
    }
  },
  "id": 1
}
In the NX-API Sandbox, click the Reset button.
In the NX-API Sandbox web application:
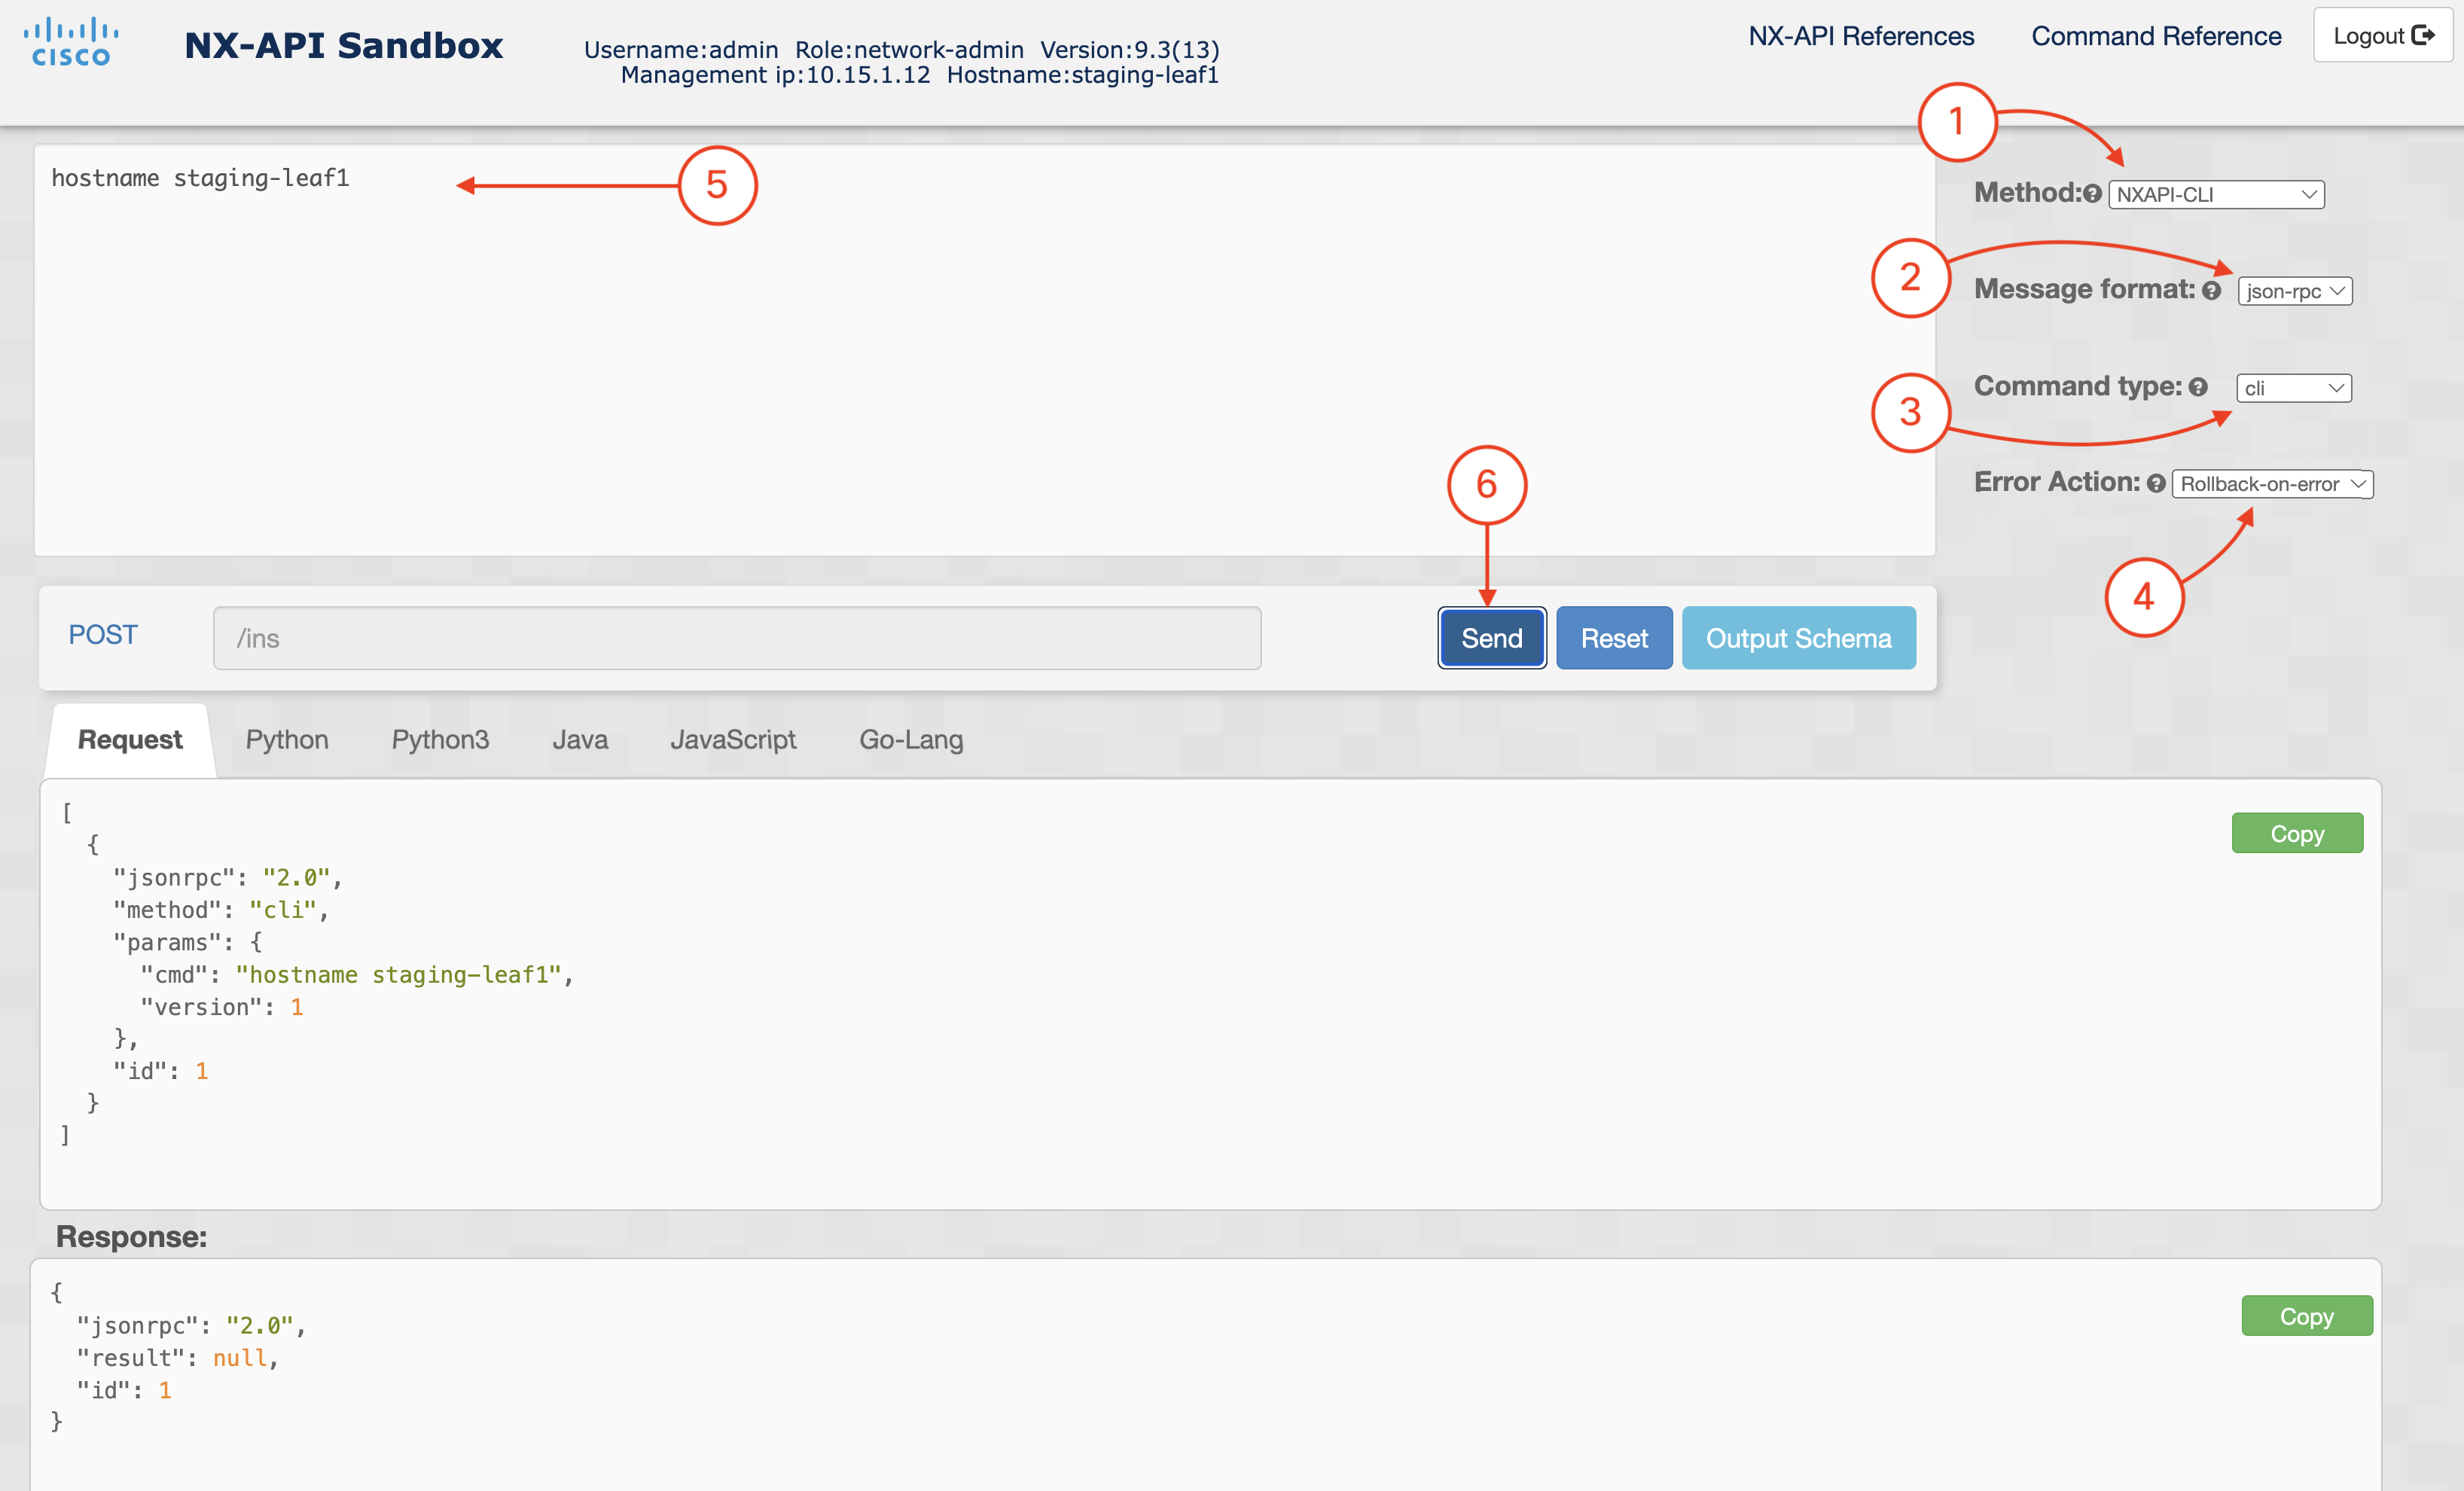
Once again, locate the two panes: Request: and Response: Within each, make note of the request and response elements and values. This time, the response provides you a data structure of key/pair values that confirm if the POST request to the device was successful or not. The result null indicates success.
Request:
[
  {
    "jsonrpc": "2.0",
    "method": "cli",
    "params": {
      "cmd": "hostname staging-l1",
      "version": 1
    },
    "id": 1,
    "rollback": "rollback-on-error"
  }
]
Response:
{
  "jsonrpc": "2.0",
  "result": null,
  "id": 1
}
In the NX-API Sandbox, click the Reset button.

Continue to the next section to explore the NX-API REST API.